On a relatively level and firm surface, block the rear wheels, put on the parking brake, put it in gear, and break the front lug nuts loose. If you have a big enough jack, just jack the frame up until the wheels are off the ground then put jack stands under the frame on both sides. Refer to your owner's manual for the jack points. But you may have to make some up on your own too, use a little piece of wood for extra protection. Just don't use anything that looks like sheetmetal, or that it might bend easily.
The struts are self-limiting packages, and are completely safe to work with as long as you DON'T loosen the large nut in the center of the top strut mount. That one nut holds the strut on the bottom to the strut mount on the top (with the highly compressed spring in the center). If you were to unscrew that, the strut would shoot one way and the mount would shoot the other way for about 15 feet. I know, I intentionally did that when I replaced my Altima front struts.
It isn't unreasonably hard to disassemble and repackage the struts for a car with a McPherson strut compressor. I tried doing it with the much stiffer Pathfinder lift springs and it wasn't going to happen. I highly recommend getting your local auto mechanic with a hydraulic or screw press to assemble your new struts for you.
To remove the strut, ensure your wheels are completely off the ground and the IFS arms are hanging free with no tension, this ensures the strut package is not compressed at all. Remove the wheel, detach the ABS wire hanging on the strut, and brake line hanging on the strut. Unbolt the front anti-sway bar and swing it into the front of the wheel well. Remove the lower 2 strut bolts securing it to the steering knuckle. Secure the bottom of the brake rotor with something. Remove the 3 nuts securing the strut package to the engine compartment. If you are lucky, your whole suspension will just fall on whatever is supporting the brake rotor. But you may have to jiggle everything around until the strut package drops down. See my first post about lifting a Pathfinder for the contortions to work the strut package out.
Reverse the steps to reinstall your newly assembled strut package.
Showing posts with label pathfinder. Show all posts
Showing posts with label pathfinder. Show all posts
Monday, June 08, 2009


Rear suspension change on a 2001 Nissan Pathfinder
So I realized my previous post on installing a lift kit on a 2001 Nissan Pathfinder didn't get into the nuts and bolts on how to do this stuff. I'll do this one on removing the rear suspension components, and another on the front. Installing is just doing the reverse.
On a relatively level and firm surface, shift the truck into 4wd, block the front wheels, put it in gear, and break the rear lug nuts loose. It is preferable to remove the panhard rod, but it is not necessary to install the lift, and you will need a bearing type puller to remove it. I tried to hammer it off, and the truck would have none of it.
If you have a big enough jack, the easiest way to do this is just jack the frame up until the wheels are off the ground then put jack stands under the frame on both sides. Refer to your owner's manual for the jack points. But you may have to make some up on your own too, use a little piece of wood for extra protection. Just don't use anything that looks like sheetmetal, or that it might bend easily. The springs won't pop out on you. They will be held just in the spring perches by the strut travel limit. At that point, the springs shouldn't have any tension on them anyway. You should be able to grab the spring and jiggle it back and forth. If they seem to have tension still, stop and recheck everything.
Now I didn't have a tall enough jack, so the alternate PITA method is to jack the truck up by the axle as far as you can, put jackstands under the frame, then lower the jack until the axle is hanging free and the wheels are off the ground. I always put a 2nd jack under the frame with a little tension on it in case the jackstands fold. I've actually had a jackstand fold up on me (fortunately I wasn't under the car). There was a slight incline where we were working, we had to take the parking brake off to remove the integrated rear brake rotor and parking brake drum on an Infiniti car (man that seemed like a stupid design), and our chocks didn't hold. A 2nd jack might give you enough time to get out from under the truck if it were falling.
Remove your first wheel and shock. That stuff is pretty straightforward. Now you are ready to remove the spring. If the panhard rod were removed, you could lower the axle until the spring just fell out. Since I left it on you need a few tricks to get the spring out. First I used the McPherson strut compressors to compress the spring a little bit to get it to slide over the lower spring perch. This is the only slightly dangerous part (aside from working under a jacked up truck). Be sure the strut compressor is installed good and use the spring safety hooks if available on the compressor. You don't want to be near that thing if it gave way.
I also put a jack underneath the axle on the other side and jacked it up just a little, which caused the wheel I was working on to droop just a little more. As you are doing this, mind the rear brake line, differential vent, and any other wiring to the axle like ABS sensors, you don't want to tear them. The spring slid out with minor effort.
Now just put everything back together with your new springs and shocks.
On a relatively level and firm surface, shift the truck into 4wd, block the front wheels, put it in gear, and break the rear lug nuts loose. It is preferable to remove the panhard rod, but it is not necessary to install the lift, and you will need a bearing type puller to remove it. I tried to hammer it off, and the truck would have none of it.
If you have a big enough jack, the easiest way to do this is just jack the frame up until the wheels are off the ground then put jack stands under the frame on both sides. Refer to your owner's manual for the jack points. But you may have to make some up on your own too, use a little piece of wood for extra protection. Just don't use anything that looks like sheetmetal, or that it might bend easily. The springs won't pop out on you. They will be held just in the spring perches by the strut travel limit. At that point, the springs shouldn't have any tension on them anyway. You should be able to grab the spring and jiggle it back and forth. If they seem to have tension still, stop and recheck everything.
Now I didn't have a tall enough jack, so the alternate PITA method is to jack the truck up by the axle as far as you can, put jackstands under the frame, then lower the jack until the axle is hanging free and the wheels are off the ground. I always put a 2nd jack under the frame with a little tension on it in case the jackstands fold. I've actually had a jackstand fold up on me (fortunately I wasn't under the car). There was a slight incline where we were working, we had to take the parking brake off to remove the integrated rear brake rotor and parking brake drum on an Infiniti car (man that seemed like a stupid design), and our chocks didn't hold. A 2nd jack might give you enough time to get out from under the truck if it were falling.
Remove your first wheel and shock. That stuff is pretty straightforward. Now you are ready to remove the spring. If the panhard rod were removed, you could lower the axle until the spring just fell out. Since I left it on you need a few tricks to get the spring out. First I used the McPherson strut compressors to compress the spring a little bit to get it to slide over the lower spring perch. This is the only slightly dangerous part (aside from working under a jacked up truck). Be sure the strut compressor is installed good and use the spring safety hooks if available on the compressor. You don't want to be near that thing if it gave way.
I also put a jack underneath the axle on the other side and jacked it up just a little, which caused the wheel I was working on to droop just a little more. As you are doing this, mind the rear brake line, differential vent, and any other wiring to the axle like ABS sensors, you don't want to tear them. The spring slid out with minor effort.
Now just put everything back together with your new springs and shocks.
Thursday, June 04, 2009
Installing an aftermarket stereo in a 2001 Pathfinder
Note: if you are really interested in this, you may want to bookmark it and come back in a week or 2 as I finish the install and flesh it out more.
I have a 2001 Nissan Pathfinder that I finally decided I wanted built in iPod control and Bluetooth. My brother recommended Kenwood, and I really liked his from about 6 years ago. After seeing the Kenwood KDC-742U was getting pretty bad reviews on Amazon, I decided to go with Pioneer. The DEH-P7000BT got great reviews, but the brand new DEH-P7100BT had some cool new features like a dot matrix display; so I decided to take a risk on it.
My Pathfinder has steering wheel controls and the crappy Bose system. Yes it sounds good when it works, but Bose stuff tends to break and is horrendously expensive to repair when it does, because every speaker has its own amplifier. OEM crap and Bose crap is expensive alone, so mixing the 2 is asking to be robbed.
Making the Bose speakers / amps happy
My speakers were still working, so I was going to keep them for $ savings. Of course Bose amps and speakers are finicky. The speakers are really low impedance 1-2 ohms, so you can't just bypass the amps and drive the speakers with an aftermarket headunit or you'll burn it out. If you wire your aftermarket speaker wires to the Bose amp inputs you will get horrible results.
If you wire your stereo with sub-4 volt RCA preamp outputs directly to the Bose inputs it is pretty much guaranteed the results will suck. It seems some people have wired their stereo with 4 volt RCA outputs directly to the Bose amps and it has worked well. The foolproof way to wire it up is to wire the stereo preamp outputs to an integration adapter with adjustable gain, and the adapter to the Bose inputs. I'm using an old Scosche FAI-3 integration adapter. They don't sell it anymore, but they sell a SLC-4 which is the same thing.
A final problem about 4 Bose amps and an electric antenna. Aftermarket stereos these days tend to have 1 lead designed to signal an amp to turn on or an electric antenna to extend. When you have just those 2 things, it generally has enough power to get the job done. But if you have 4 amps and possibly an antenna it is usually just too much. The answer is to install a relay that has enough power to turn all 4 or 5 devices on.
Some parts you'll need -
Metra 70-7551 Nissan 1995-2007 with RCA outputs or 70-7550 with bare wires
Metra xxxxx Nissan 1987-1994 with bare wires
Metra 40-NI10 Nissan antenna adapter to aftermarket stereo
Adapter for OEM steering wheel control of aftermarket stereo
PAC Audio makes adapters to control your new aftermarket stereo with your OEM steering wheel controls. Most car manufacturers have one wire that goes to the steering wheel remote control. Each button contains a resistor with a different ohm rating. The stereo detects the resistance on that single wire to determine which function is being requested.
So of course PAC adapters expect this, and of course Nissan (along with Harley) do something different. They've got one wire for each remote control button. That's pretty wasteful in the automotive industry, but whatever. For a PAC Audio adapter to work with a Nissan, you've got to connect a different resistor between 46 ohms and 2k ohms to each of the remote control button wires, then connect all of those resistors to the white wire on the PAC unit. Doing this right in the wires as they recommend is asking for a fatigue break, so I am going to mount them on a PCB and use stranded wire coming on and off the board.
One note of caution if you try to test the wires coming from the remote control buttons. They aren't just simple switches. With the ignition off, if you press a button, you will find the resistance changes slightly on all 5 wires. This confused the hell out of me until I decided to try it with the key in ACC. When I did that, the resistance changed a lot on only the wire connected to that button and not at all on the other 4 wires. So the remote control has some kind of probably solid state relay inside it that must be powered to work.
So, I decided to put the amp turn-on relay and steering wheel resistor network in a single little box. I used the following parts -
Radio Shack - Expensive but immediately available
275-233 SPST 12VDC Reed Relay with 0.5A@125VAC contacts
276-159 Dual General Purpose IC PC Board
270-408 Enclosed 2 AA Battery Holder
22 gauge stranded wire
I gutted the battery holder, enlarged the hole with the wires exiting and made a new hole on the other side so I could get a total of 10 wires out of it. I scored the PCB so it would fit, then I soldered the relay, resistors and wires to the PCB board. Finally I buttoned it all up and got ready to wire it in.
Proper crimping
The wire crimpers sold at auto stores do a horrible job. They don't make a reliable and solid connection. You should use a ratcheting style terminal crimper. They can be found on eBay for about $30, but are generally $100 if you go to a good electrical hardware shop. You can learn a lot about proper crimping here -
http://www.pbase.com/mainecruising/wire_termination
I have a 2001 Nissan Pathfinder that I finally decided I wanted built in iPod control and Bluetooth. My brother recommended Kenwood, and I really liked his from about 6 years ago. After seeing the Kenwood KDC-742U was getting pretty bad reviews on Amazon, I decided to go with Pioneer. The DEH-P7000BT got great reviews, but the brand new DEH-P7100BT had some cool new features like a dot matrix display; so I decided to take a risk on it.
My Pathfinder has steering wheel controls and the crappy Bose system. Yes it sounds good when it works, but Bose stuff tends to break and is horrendously expensive to repair when it does, because every speaker has its own amplifier. OEM crap and Bose crap is expensive alone, so mixing the 2 is asking to be robbed.
Making the Bose speakers / amps happy
My speakers were still working, so I was going to keep them for $ savings. Of course Bose amps and speakers are finicky. The speakers are really low impedance 1-2 ohms, so you can't just bypass the amps and drive the speakers with an aftermarket headunit or you'll burn it out. If you wire your aftermarket speaker wires to the Bose amp inputs you will get horrible results.
If you wire your stereo with sub-4 volt RCA preamp outputs directly to the Bose inputs it is pretty much guaranteed the results will suck. It seems some people have wired their stereo with 4 volt RCA outputs directly to the Bose amps and it has worked well. The foolproof way to wire it up is to wire the stereo preamp outputs to an integration adapter with adjustable gain, and the adapter to the Bose inputs. I'm using an old Scosche FAI-3 integration adapter. They don't sell it anymore, but they sell a SLC-4 which is the same thing.
A final problem about 4 Bose amps and an electric antenna. Aftermarket stereos these days tend to have 1 lead designed to signal an amp to turn on or an electric antenna to extend. When you have just those 2 things, it generally has enough power to get the job done. But if you have 4 amps and possibly an antenna it is usually just too much. The answer is to install a relay that has enough power to turn all 4 or 5 devices on.
Some parts you'll need -
Metra 70-7551 Nissan 1995-2007 with RCA outputs or 70-7550 with bare wires
Metra xxxxx Nissan 1987-1994 with bare wires
Metra 40-NI10 Nissan antenna adapter to aftermarket stereo
Adapter for OEM steering wheel control of aftermarket stereo
PAC Audio makes adapters to control your new aftermarket stereo with your OEM steering wheel controls. Most car manufacturers have one wire that goes to the steering wheel remote control. Each button contains a resistor with a different ohm rating. The stereo detects the resistance on that single wire to determine which function is being requested.
So of course PAC adapters expect this, and of course Nissan (along with Harley) do something different. They've got one wire for each remote control button. That's pretty wasteful in the automotive industry, but whatever. For a PAC Audio adapter to work with a Nissan, you've got to connect a different resistor between 46 ohms and 2k ohms to each of the remote control button wires, then connect all of those resistors to the white wire on the PAC unit. Doing this right in the wires as they recommend is asking for a fatigue break, so I am going to mount them on a PCB and use stranded wire coming on and off the board.
One note of caution if you try to test the wires coming from the remote control buttons. They aren't just simple switches. With the ignition off, if you press a button, you will find the resistance changes slightly on all 5 wires. This confused the hell out of me until I decided to try it with the key in ACC. When I did that, the resistance changed a lot on only the wire connected to that button and not at all on the other 4 wires. So the remote control has some kind of probably solid state relay inside it that must be powered to work.
So, I decided to put the amp turn-on relay and steering wheel resistor network in a single little box. I used the following parts -
Radio Shack - Expensive but immediately available
275-233 SPST 12VDC Reed Relay with 0.5A@125VAC contacts
276-159 Dual General Purpose IC PC Board
270-408 Enclosed 2 AA Battery Holder
22 gauge stranded wire
I gutted the battery holder, enlarged the hole with the wires exiting and made a new hole on the other side so I could get a total of 10 wires out of it. I scored the PCB so it would fit, then I soldered the relay, resistors and wires to the PCB board. Finally I buttoned it all up and got ready to wire it in.
Proper crimping
The wire crimpers sold at auto stores do a horrible job. They don't make a reliable and solid connection. You should use a ratcheting style terminal crimper. They can be found on eBay for about $30, but are generally $100 if you go to a good electrical hardware shop. You can learn a lot about proper crimping here -
http://www.pbase.com/mainecruising/wire_termination
Saturday, December 29, 2007
Installing a suspension lift on my 2001 Pathfinder... or finding Dante's hell.
Abstract -
DON'T buy Rancho RS5000 shocks for R50 Pathfinders, EXPECT installation to take at least 10 hours of work your first time in a home garage, DON'T start this project without having a mechanic you trust with the proper hydraulic press willing to assemble the strut packages - those pansy screw MacPherson strut compressors won't cut it on the bigger and stiffer lift springs.
On to the full text -
I decided to lift my 2001 Nissan Pathfinder so it would look more like a truck and less like a minivan. The shocks blew out a couple days before Christmas so I figured it was easier to do the whole enchilada now. I went with Automotive Customizers 2 inch lift springs. Also from them I got KYB front struts, Rancho RS5000 shocks, and strut boots. I was mostly happy with AC's service. I emailed them Thursday night before Christmas asking if they could get the parts to me within a week. They called me early the next day to say they could, and again that afternoon to check on me, but I didn't return their call till late Friday. AC still was able to get the stuff to me in a week. Great customer service, I just don't think they should be selling Rancho RS5000 shocks as fitting R50 Pathfinders (more on that later).
From Summit Racing I got the camber adjustment bolts. Contrary to their website, you only need 1 kit per car for up to 2 degrees camber adjustment, or 2 kits per car for up to 4 degrees. I don't know how keen I am on using 2 kits per car. The bolts are substantially thinner to accommodate the eccentric cam. I haven't found a good guide for installing lift springs on R50 Pathfinders, and the official service manual is pretty weak on removing and installing the struts, shocks, and springs. AC's directions for rear coil installation are fairly generic but they were the best I found, and I have done strut replacements on an Altima. I thought I knew what I was getting into, that was mistake number one.
I started with the rear shocks/springs installation because I thought it would be easiest, and frighteningly it was. I found some significant problems with AC's directions in this specific application. It is impossible to remove the panhard rod axle end without a splitter. In the end I didn't remove it because it helps prevent over-extension of the middle brake line. There was no way to loosen that brake line without cracking the system open, you have to disconnect the 2 steel lines on the distribution block to the flexible line or deal with the limited travel. Be sure to remove the axle vent hose on top of the differential because it is too short. Due to the problems above I was unable to drop the axle enough, but I used the MacPherson strut compressor in an "unauthorized" way to get the old springs out and the new springs in, this took a lot of wrestling.
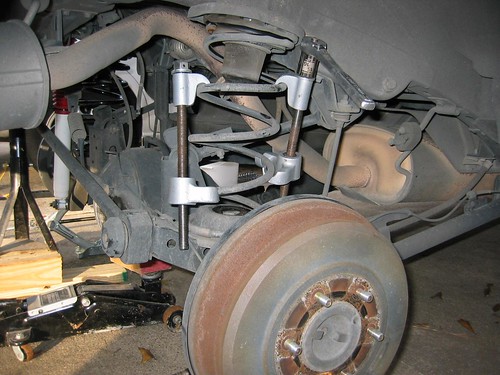
There is a rubber donut in the upper rear spring mount you can reuse. The short length of split rubber tubing around the spring in the lower mount is not reusable because the lift springs are much larger gauge. I didn't want to make another trip to the parts store, so I left it out and crossed my fingers that won't cause creaking or clanking. This split rubber hose is also used in the top and bottom of the front springs and I left it out there as well.
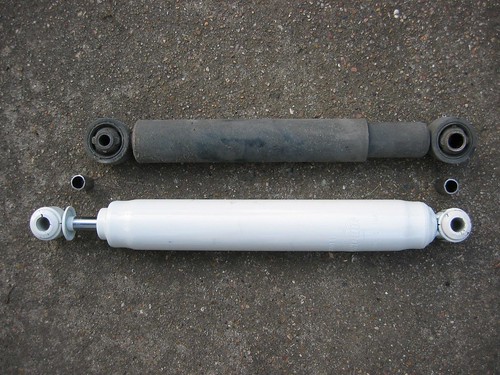
Rancho doesn't list applicability for the RS5000's on R50 Pathfinders, and there is a reason - they DON'T fit. I'm disappointed in AC for advertising they fit. The Rancho shock mounting eyelets are the same size, while the OEM eyelets are not. The inner metal bushing through the top mount is almost a half inch too narrow requiring the use of at least 2 washers to fill the gap, the bushing is also at least one size too small for the OEM mounting bolt, and tightening the nut to the recommended 55ft/lbs unacceptably compresses the ears of the shock mount together.
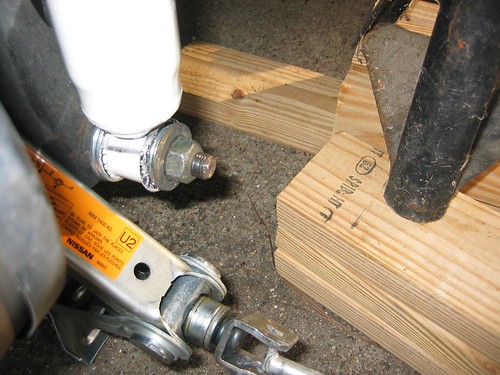
The bottom metal bushing is too small for use with OEM mounting stud, the stud barely fits through only the rubber bushing. I had to use 4 washers, 2 behind the eyelet, and 2 in front, and still the rubber bushing is unacceptably compressed because it doesn't have the support of an inner metal bushing. Shocks are also designed to act as the axle extension stop so the springs don't pop out, and the brake and vent lines don't over-extend. The RS5000's will probably keep the springs in, but I think the rear brake flexible line could easily over-extend and tear. Good thing the front brakes do all the work and I have ABS.
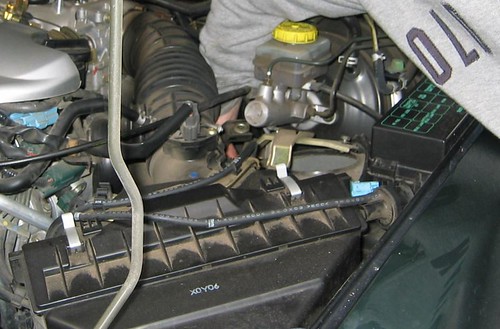
The front struts/springs ended up being MUCH harder than I planned even though I have done them before on an Altima. To get to the driver's side upper strut bracket, you must remove an accessory bracket over it. The top and air box bolts are easy. The inner wheel well bolt is almost impossible to get at. If your arm is any bigger than mine it won't fit, you'll have to remove the airbox to intake plenum, which is a major ordeal because of all the mount points and accessories hanging off it.
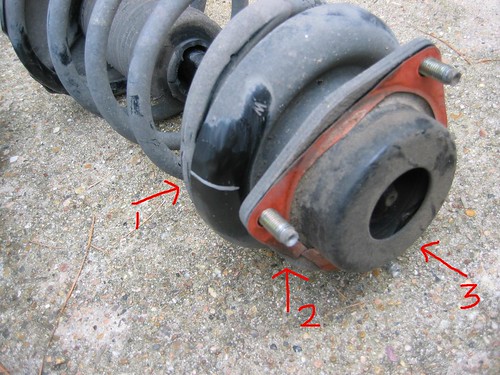
If you have never done struts before, the strut bracket only fits one way; but too many inexperienced mechanics don't know that and force them in the wrong way. Mark a stud to the hood ledge hole as shown by the 2nd red arrow. You can't wiggle the struts around enough to get them out unless you remove all hardware mounting both struts. My knuckle bolts were WAY over torqued (over 200ft/lbs) along with several other bolts on front and back suspension components. Use only 6 point sockets so you don't round the nut heads off (it will ruin your month if you do), and use a breaker bar being careful to keep the socket squared up on the nut head. When the struts are loose, with 2 people rotate the anti-sway bar up as far as you can. Finally you will be able to remove the strut by kicking the knuckle end out, down, and to the back of the car while rotating the strut top down, and to the front of the car.
The upper spring seat only fits one way. Mark it to the stud position also, like the 1st red arrow. Since the strut bracket and spring seat rotate independently when the spring tension is relieved, this mark might not be valid if the previous mechanic installed it wrong like mine did. Finally there is a notch and stamped arrow about where the 3rd red arrow is on back of the spring seat. It must face towards the engine. There should be a (W) on the spring seat 180 degrees around from the notch which will face the same direction as the knuckle mount (towards you when installed). This is all very important to have aligned when your mechanic reassembles the strut, or if you do it, when you relieve the pressure from the spring compressor.
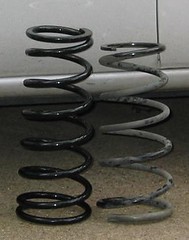
I read several places AC springs are the same size as OEM with a higher spring rate. This is incorrect. They are much heavier gauge with at least one more turn than OEM. The rear springs were about 0.75" longer and the fronts were 1.5" longer. These factors combined with the increased stiffness makes it almost impossible to use a standard MacPherson strut compressor to assemble the strut packages. I highly advise to not try unless you can afford for your truck to be out of commission for a week while you fidget and curse with them.
KYB struts are NOT exact OEM replacements (but they are close). Notice the first ABS wire bracket on the OEM. Now notice there is only a tab with captive nut on the KYB strut. It is another PITA I was unaware of, but it is not the end of the world to cut the bracket off the old strut, drill a hole and use a M6 x 20mm bolt and lock washer to attach it to the KYB tab.

Beware of Conroe NTB
Now why did I say have a mechanic you trust ready to assemble the struts? I ran out of steam trying to assemble them myself so I called my local NTB to ask if they would do it and how much. The manager said they usually don't do that kind of stuff, but he would get one of his mechanics to do it under the table if I tip the mechanic. When I got there he said he talked to the mechanic who requested $50 (apparently they are running their own little shop out of the NTB store, they just don't like to quote prices over the phone). I was planning on tipping him $30-40, but if he did it right $50 was worth it to be done with the problem. As the manager walked off, I said I didn't know if this was normal, but the notch (mentioned way above) needed to face opposite the knuckle. The manager huffed that his mechanic knew what he was doing.
Twenty minutes later and $50 lighter I leave for home. When I go to install the struts I discover the mechanic installed both of the spring seats 180 degrees in the wrong direction. Even worse, he didn't install one of the the thrust washers evenly so the seat and mount are cocked at an angle and won't rotate. By now NTB is closed, the manager isn't there tomorrow, I have a job done poorly and incorrectly that I have no evidence they did, or I "paid" for. I know, it was my own fault for agreeing to the arrangement, but I suggest to not let it happen to you.
No more to report
I'm stuck at this point. I have to go back to work in Dallas for a week without my truck while my dad tries to track down a competent mechanic to correct the strut packages. When I get it all patched up, I'll report back on how I like the ride and components (aside from the non-fitting RS5000 shocks).
DON'T buy Rancho RS5000 shocks for R50 Pathfinders, EXPECT installation to take at least 10 hours of work your first time in a home garage, DON'T start this project without having a mechanic you trust with the proper hydraulic press willing to assemble the strut packages - those pansy screw MacPherson strut compressors won't cut it on the bigger and stiffer lift springs.
On to the full text -
I decided to lift my 2001 Nissan Pathfinder so it would look more like a truck and less like a minivan. The shocks blew out a couple days before Christmas so I figured it was easier to do the whole enchilada now. I went with Automotive Customizers 2 inch lift springs. Also from them I got KYB front struts, Rancho RS5000 shocks, and strut boots. I was mostly happy with AC's service. I emailed them Thursday night before Christmas asking if they could get the parts to me within a week. They called me early the next day to say they could, and again that afternoon to check on me, but I didn't return their call till late Friday. AC still was able to get the stuff to me in a week. Great customer service, I just don't think they should be selling Rancho RS5000 shocks as fitting R50 Pathfinders (more on that later).
From Summit Racing I got the camber adjustment bolts. Contrary to their website, you only need 1 kit per car for up to 2 degrees camber adjustment, or 2 kits per car for up to 4 degrees. I don't know how keen I am on using 2 kits per car. The bolts are substantially thinner to accommodate the eccentric cam. I haven't found a good guide for installing lift springs on R50 Pathfinders, and the official service manual is pretty weak on removing and installing the struts, shocks, and springs. AC's directions for rear coil installation are fairly generic but they were the best I found, and I have done strut replacements on an Altima. I thought I knew what I was getting into, that was mistake number one.
I started with the rear shocks/springs installation because I thought it would be easiest, and frighteningly it was. I found some significant problems with AC's directions in this specific application. It is impossible to remove the panhard rod axle end without a splitter. In the end I didn't remove it because it helps prevent over-extension of the middle brake line. There was no way to loosen that brake line without cracking the system open, you have to disconnect the 2 steel lines on the distribution block to the flexible line or deal with the limited travel. Be sure to remove the axle vent hose on top of the differential because it is too short. Due to the problems above I was unable to drop the axle enough, but I used the MacPherson strut compressor in an "unauthorized" way to get the old springs out and the new springs in, this took a lot of wrestling.
There is a rubber donut in the upper rear spring mount you can reuse. The short length of split rubber tubing around the spring in the lower mount is not reusable because the lift springs are much larger gauge. I didn't want to make another trip to the parts store, so I left it out and crossed my fingers that won't cause creaking or clanking. This split rubber hose is also used in the top and bottom of the front springs and I left it out there as well.
Rancho doesn't list applicability for the RS5000's on R50 Pathfinders, and there is a reason - they DON'T fit. I'm disappointed in AC for advertising they fit. The Rancho shock mounting eyelets are the same size, while the OEM eyelets are not. The inner metal bushing through the top mount is almost a half inch too narrow requiring the use of at least 2 washers to fill the gap, the bushing is also at least one size too small for the OEM mounting bolt, and tightening the nut to the recommended 55ft/lbs unacceptably compresses the ears of the shock mount together.
The bottom metal bushing is too small for use with OEM mounting stud, the stud barely fits through only the rubber bushing. I had to use 4 washers, 2 behind the eyelet, and 2 in front, and still the rubber bushing is unacceptably compressed because it doesn't have the support of an inner metal bushing. Shocks are also designed to act as the axle extension stop so the springs don't pop out, and the brake and vent lines don't over-extend. The RS5000's will probably keep the springs in, but I think the rear brake flexible line could easily over-extend and tear. Good thing the front brakes do all the work and I have ABS.
The front struts/springs ended up being MUCH harder than I planned even though I have done them before on an Altima. To get to the driver's side upper strut bracket, you must remove an accessory bracket over it. The top and air box bolts are easy. The inner wheel well bolt is almost impossible to get at. If your arm is any bigger than mine it won't fit, you'll have to remove the airbox to intake plenum, which is a major ordeal because of all the mount points and accessories hanging off it.
If you have never done struts before, the strut bracket only fits one way; but too many inexperienced mechanics don't know that and force them in the wrong way. Mark a stud to the hood ledge hole as shown by the 2nd red arrow. You can't wiggle the struts around enough to get them out unless you remove all hardware mounting both struts. My knuckle bolts were WAY over torqued (over 200ft/lbs) along with several other bolts on front and back suspension components. Use only 6 point sockets so you don't round the nut heads off (it will ruin your month if you do), and use a breaker bar being careful to keep the socket squared up on the nut head. When the struts are loose, with 2 people rotate the anti-sway bar up as far as you can. Finally you will be able to remove the strut by kicking the knuckle end out, down, and to the back of the car while rotating the strut top down, and to the front of the car.
The upper spring seat only fits one way. Mark it to the stud position also, like the 1st red arrow. Since the strut bracket and spring seat rotate independently when the spring tension is relieved, this mark might not be valid if the previous mechanic installed it wrong like mine did. Finally there is a notch and stamped arrow about where the 3rd red arrow is on back of the spring seat. It must face towards the engine. There should be a (W) on the spring seat 180 degrees around from the notch which will face the same direction as the knuckle mount (towards you when installed). This is all very important to have aligned when your mechanic reassembles the strut, or if you do it, when you relieve the pressure from the spring compressor.
I read several places AC springs are the same size as OEM with a higher spring rate. This is incorrect. They are much heavier gauge with at least one more turn than OEM. The rear springs were about 0.75" longer and the fronts were 1.5" longer. These factors combined with the increased stiffness makes it almost impossible to use a standard MacPherson strut compressor to assemble the strut packages. I highly advise to not try unless you can afford for your truck to be out of commission for a week while you fidget and curse with them.
KYB struts are NOT exact OEM replacements (but they are close). Notice the first ABS wire bracket on the OEM. Now notice there is only a tab with captive nut on the KYB strut. It is another PITA I was unaware of, but it is not the end of the world to cut the bracket off the old strut, drill a hole and use a M6 x 20mm bolt and lock washer to attach it to the KYB tab.
Beware of Conroe NTB
Now why did I say have a mechanic you trust ready to assemble the struts? I ran out of steam trying to assemble them myself so I called my local NTB to ask if they would do it and how much. The manager said they usually don't do that kind of stuff, but he would get one of his mechanics to do it under the table if I tip the mechanic. When I got there he said he talked to the mechanic who requested $50 (apparently they are running their own little shop out of the NTB store, they just don't like to quote prices over the phone). I was planning on tipping him $30-40, but if he did it right $50 was worth it to be done with the problem. As the manager walked off, I said I didn't know if this was normal, but the notch (mentioned way above) needed to face opposite the knuckle. The manager huffed that his mechanic knew what he was doing.
Twenty minutes later and $50 lighter I leave for home. When I go to install the struts I discover the mechanic installed both of the spring seats 180 degrees in the wrong direction. Even worse, he didn't install one of the the thrust washers evenly so the seat and mount are cocked at an angle and won't rotate. By now NTB is closed, the manager isn't there tomorrow, I have a job done poorly and incorrectly that I have no evidence they did, or I "paid" for. I know, it was my own fault for agreeing to the arrangement, but I suggest to not let it happen to you.
No more to report
I'm stuck at this point. I have to go back to work in Dallas for a week without my truck while my dad tries to track down a competent mechanic to correct the strut packages. When I get it all patched up, I'll report back on how I like the ride and components (aside from the non-fitting RS5000 shocks).
Subscribe to:
Posts (Atom)