I have all of my music on my media server, and it is being shared by Firefly and Avahi so I can easily listen to it on any computer with Rythmbox or iTunes. Firefly is the media server. Avahi is also called Bonjour by Apple or Zeroconf or Autodiscover. It is the service that advertises Firefly to iTunes. It also advertises printers to Mac computers.
There are some pretty good explanations on the internet how to initially set up Firefly, but most of them miss an important part at the end so the next time you reboot, iTunes can still autodiscover the shared music library. I'll briefly go over the first steps in case they disappear off the net
Avahi is probably already installed and autostarts on your Ubuntu machine
Install firefly
sudo apt-get install mt-daapd
Install ID3 tag reading package
sudo apt-get install libid3tag0
Start firefly
sudo /etc/init.d/mt-daapd start
Update startup scripts so firefly restarts
sudo update-rc.d mt-daapd defaults
Go to firefly config page (or config file) and tell it your music directory
http://localhost:3689 or sudo nano /etc/mt-daapd.conf
Restart firefly
sudo /etc/init.d/mt-daapd restart
Now we need to configure Avahi to serve Firefly correctly after reboots. For some reason it will work right after installation without this. But the next reboot it would quit working.
sudo nano /etc/avahi/services/mt-daapd.service
Paste into that file
I give up, posting code into Blogger with less than symbols is broken and a huge pain in the butt. Check the link above for the code.
Restart Avahi
# /etc/init.d/avahi-daemon restart
That's it. You should now be able to see your shared music library on iTunes. And it should survive a reboot.
Sunday, June 14, 2009
Pioneer DEH-P7100BT Car Stereo Review
I just put a Pioneer DEH-P7100BT stereo in my car. It is their top of the line single din stereo with integrated Bluetooth and iPod control. It is dumb that companies are still making mid and top of the line stereos requiring $100 adapters for those features. Personally I think companies should get rid of the CD player and add integrated BT, iPod, more USB/memory card inputs, and HD radio to their stereos. They still charge an arm and a leg for HD, but it costs maybe $2 in additional chips. I also installed a PAC-Audio SWI-PS OEM steering wheel remote adapter.
I considered this Pioneer, one older and cheaper Pioneer model, and a Kenwood model. The Kenwood had pretty poor reviews for BT sound quality and pairing robustness. I chose the new high end Pioneer because I liked the 2nd USB input, the multi line display. iTunes tagging and telephone voice control also sounded intriguing.
The Pioneer is a solid piece of hardware. It could be a really enjoyable stereo with some firmware updates to resolve interface errors. As it stands, the user experience is pretty dodgy. I would probably buy the cheaper Pioneer model, instead of this one absent improvements, if I could do it again. I hope Pioneer recognizes these problems, and releases a firmware update I can apply to my unit.
The big problems -
The tune and seek buttons are the same. You press the button quickly to go to the next possible channel (up or down by 0.2 mhz exactly), or press and release after the beep to go to the next receivable channel, or continue to hold to quickly scan through the stations. The problem is if you don't release the button in less than a tenth of a second after the beep, the radio may scan past the next receivable station (especially if it is within 0.2 - 0.6 mhz of the current station), and land on the receivable station several away from where you currently were. The radio should have a debounce in the button so if you release within 0.3 seconds, the radio will back up to the receivable station immediately after where you were, even if it has already scanned past it. As much as I don't like Sony, I've seen this feature in their products and I LOVE it.
The display has some moving and static "screensavers" it shows. I'm not a big fan of the moving ones (but to each his own).What I find disgraceful, is even the 2 simple static screensavers, and few elaborate static screensavers, reverse their contrast every so many seconds. There is no way to have a completely static display, and no way to stop the contrast changes. It is visually annoying, and the dark text on light background is way too bright at night. I want a simple display frozen at light text on dark background. It is funny because occasionally the stereo will forget to change contrast, but if you press a button it will wake up and start doing it again. You can turn "reverse mode" off. It is on page 51 of the owner's manual. I had read the owner's manual 3 times before posting this information. Stupidly the manual never uses the obvious word "display contrast" and instead calls it "screen indication". So I thought this setting meant if you were in the middle of the menu, it would start backing out of the menu after 20 seconds of no activity. Chalk this one up to incredibly poor owner's manual writing.
You can set the daytime brightness of the display "undimmed" (with the headlights off). But you can't set the nighttime brightness of the display dimmed, and the amount it automatically dims is not near enough. It should either dim the display much more when you turn on the headlights, or you should preferably be able to set both the daytime and nighttime brightness. You can do this too, and this one was my fault. What can I say? Trying to take in a whole manual in 2 days, especially one where the device isn't intuitive can lead to forgetfulness. Again it is stupid, but you have to turn the ignition on, headlights off, and stereo off to get to the menu to set the daytime brightness. Alternatively you have to turn the ignition on, headlights on, and stereo off to get to the menu to set the nighttime brightness. This is no longer a big problem, but it would be even cooler if you could set the daytime setting with negative contrast (dark text on light background) and nighttime setting with positive contrast (light text on dark background).
When you seek or scan to a channel that also happens to be a preset station, the radio never identifies it as a preset. This is pretty annoying when trying to set your preset stations. Also when you are setting a preset station, the preset number will flash twice, then the new station will appear next to the preset number. If you release the button while the preset number is still flashing but before the new station number appears, instead of setting the new preset, the radio will tune to the current preset. This is incredibly counter-intuitive and annoying. There is no reason to tune to a preset from the preset setting screen. As soon as activity begins on the screen, releasing the button should set the new preset.
The display flow is a disaster. First the preset number is tiny and in the top right corner. It should be bigger. The station number is bigger, but it should be bigger still. The station number is ONLY shown for a few seconds in the bottom right of the screen. That 8 digit area is reused as a scrolling RDS display until all data is received. If the radio station is kind enough to embed their station number in the RDS data, you might get a second chance to see the station number. Otherwise the radio never again shows you the station number unless you go into another function and back out. After all RDS data is received, the band and song name is reposted in 2 lines in the bottom left.
How should it flow? First the preset number and radio station number should ALWAYS remain visible in 2 lines on the right side of the display (preset line smaller). Second, RDS data should be posted as received sequentially in 2 (potentially smaller) lines in the bottom left of the display. This may mean the data is in the wrong position. After all data is received, the RDS data could be reposted in the correct format in the same place.
The small problems -
The radio tune/seek button (rather than the preset seek) is also the song skip button for CD and iPod control. This is apparently a problem with every brand that shares the Pioneer remote control protocol. This means if you have a remote control on your steering wheel, you can skip songs but you can't go to the next preset station. Instead you go to the next station you probably don't want.
In CD mode, preset seek may seek through the song (though that is counter intuitive), so you might not want to change anything in CD mode. But in iPod mode, preset seek does nothing. Instead in iPod mode, both tune/seek and preset seek should skip songs. To get around the annoyance factor, I set my steering wheel station up button to be seek up/song up, and my steering wheel station down button to be preset down.
When the Bluetooth unit imports your phone book, if you have multiple phone numbers for one contact, it imports them all with the title "default". So you can't use the voice dialing to chose the right number to call. And to dial the correct number on the display, you have to remember the acutal phone number you want to call for that contact and not just the phone number name. This is a silly problem I hope Parrot and Pioneer quickly fix and issue a firmware update. If they don't it pretty much negates the whole "feature" of the software upgradeable Bluetooth unit.
The stereo should be smart enough to skip inputs (Aux 1, Aux 2, USB 1, USB 2, BT) if a device is not connected, but automatically offer the option if something is connected. Currently you can manually disable Aux 1 & 2 & BT, but not USB 1 & 2. This is 2009 and the stereo should do better.
The button layout and combinations isn't very logical, and it is easy to press left/right/up/down part of the rotating joystick when you were trying to press the center select. The buttons around the joystick are also partially hidden and hard for big fingers to press.
In bright sun, the display can be hard to see due to the shiny surface and bright (but not super bright) display. The radio also seems to pick up a little more static than my factory radio from 2001.
Enough
Well, that is enough for now. I'll add more to this post as I discover it.
I considered this Pioneer, one older and cheaper Pioneer model, and a Kenwood model. The Kenwood had pretty poor reviews for BT sound quality and pairing robustness. I chose the new high end Pioneer because I liked the 2nd USB input, the multi line display. iTunes tagging and telephone voice control also sounded intriguing.
The Pioneer is a solid piece of hardware. It could be a really enjoyable stereo with some firmware updates to resolve interface errors. As it stands, the user experience is pretty dodgy. I would probably buy the cheaper Pioneer model, instead of this one absent improvements, if I could do it again. I hope Pioneer recognizes these problems, and releases a firmware update I can apply to my unit.
The big problems -
The tune and seek buttons are the same. You press the button quickly to go to the next possible channel (up or down by 0.2 mhz exactly), or press and release after the beep to go to the next receivable channel, or continue to hold to quickly scan through the stations. The problem is if you don't release the button in less than a tenth of a second after the beep, the radio may scan past the next receivable station (especially if it is within 0.2 - 0.6 mhz of the current station), and land on the receivable station several away from where you currently were. The radio should have a debounce in the button so if you release within 0.3 seconds, the radio will back up to the receivable station immediately after where you were, even if it has already scanned past it. As much as I don't like Sony, I've seen this feature in their products and I LOVE it.
The display has some moving and static "screensavers" it shows. I'm not a big fan of the moving ones (but to each his own).
When you seek or scan to a channel that also happens to be a preset station, the radio never identifies it as a preset. This is pretty annoying when trying to set your preset stations. Also when you are setting a preset station, the preset number will flash twice, then the new station will appear next to the preset number. If you release the button while the preset number is still flashing but before the new station number appears, instead of setting the new preset, the radio will tune to the current preset. This is incredibly counter-intuitive and annoying. There is no reason to tune to a preset from the preset setting screen. As soon as activity begins on the screen, releasing the button should set the new preset.
The display flow is a disaster. First the preset number is tiny and in the top right corner. It should be bigger. The station number is bigger, but it should be bigger still. The station number is ONLY shown for a few seconds in the bottom right of the screen. That 8 digit area is reused as a scrolling RDS display until all data is received. If the radio station is kind enough to embed their station number in the RDS data, you might get a second chance to see the station number. Otherwise the radio never again shows you the station number unless you go into another function and back out. After all RDS data is received, the band and song name is reposted in 2 lines in the bottom left.
How should it flow? First the preset number and radio station number should ALWAYS remain visible in 2 lines on the right side of the display (preset line smaller). Second, RDS data should be posted as received sequentially in 2 (potentially smaller) lines in the bottom left of the display. This may mean the data is in the wrong position. After all data is received, the RDS data could be reposted in the correct format in the same place.
The small problems -
The radio tune/seek button (rather than the preset seek) is also the song skip button for CD and iPod control. This is apparently a problem with every brand that shares the Pioneer remote control protocol. This means if you have a remote control on your steering wheel, you can skip songs but you can't go to the next preset station. Instead you go to the next station you probably don't want.
In CD mode, preset seek may seek through the song (though that is counter intuitive), so you might not want to change anything in CD mode. But in iPod mode, preset seek does nothing. Instead in iPod mode, both tune/seek and preset seek should skip songs. To get around the annoyance factor, I set my steering wheel station up button to be seek up/song up, and my steering wheel station down button to be preset down.
When the Bluetooth unit imports your phone book, if you have multiple phone numbers for one contact, it imports them all with the title "default". So you can't use the voice dialing to chose the right number to call. And to dial the correct number on the display, you have to remember the acutal phone number you want to call for that contact and not just the phone number name. This is a silly problem I hope Parrot and Pioneer quickly fix and issue a firmware update. If they don't it pretty much negates the whole "feature" of the software upgradeable Bluetooth unit.
The stereo should be smart enough to skip inputs (Aux 1, Aux 2, USB 1, USB 2, BT) if a device is not connected, but automatically offer the option if something is connected. Currently you can manually disable Aux 1 & 2 & BT, but not USB 1 & 2. This is 2009 and the stereo should do better.
The button layout and combinations isn't very logical, and it is easy to press left/right/up/down part of the rotating joystick when you were trying to press the center select. The buttons around the joystick are also partially hidden and hard for big fingers to press.
In bright sun, the display can be hard to see due to the shiny surface and bright (but not super bright) display. The radio also seems to pick up a little more static than my factory radio from 2001.
Enough
Well, that is enough for now. I'll add more to this post as I discover it.
Saturday, June 13, 2009
Sr. Kathleen died
I've had this sitting in my drafts for several years now and forgot about it -
On Saturday, February 11, 2006, St. Rose of Lima Catholic Church and Elementary School had a memorial mass for Sr. Mary Kathleen Mitchell, its principal from 1979-1989. Most people probably barely remember their principal from elementary school, but I think that would be different for the kids who attended St. Rose during her tenure.
I have a special affinity for her since she was good friends with my parents and a second mother figure to me. I saw her once while she was back in Houston for a visit in 1994; my mother talked to her on the phone a couple times after that. As with any time a special person in your life dies that you haven't seen in a while, I feel guilty about not making a better effort to stay in touch with her.
At the mass, I saw former classmate Rene Lozano, his mother and sister, Jane Fucheck (former 5th grade co-teacher, and Principal of Seton), Ms. Andrews (my former co-teacher, still teaching 2nd grade), and several other school employees I recognized but couldn't put a name to. I also saw 2 other people who were likely former students, but I didn't recognize them. There were about 60 people in a Church that can hold several hundred.
Both the memorial, and how empty the Church remained was sad. To me it didn't say few people cared she passed on; I would like to think many more would have come if they knew about the mass. Instead, I think it said something about the mobility, tenuous roots, and lack of continuity of communication in our communities today.
I would encourage any former St. Rose community members that can afford to - make a contribution in Sr. Kathleen's honor to St. Rose, the Sisters of St. Joseph of Carondelet, or the National MS Society.
Published Obituary
1946-2006 Sister Mary Kathleen Mitchell, 59, passed away January 27, 2006 at Nazareth Living Center, St. Louis, MO from congestive heart failure due to complications of Multiple Sclerosis. She was born April 27, 1946 in KCMO to John McGinley Mitchell and Mary Kathleen Mitchell (Aylward). She was preceded in death by her parents John McGinley Mitchell and Mary Kathleen Mitchell and her brother J. Michael Mitchell. She entered the Sisters of St. Joseph on September 12, 1964 and made her final profession October 14, 1972. She graduate from St. Teresa's Academy in 1964 and Fontbonne College University, St. Louis, MO in 1969 with a B.A. in English/Elementary School and a M.A. in 1979 in Reading Specialist from Clarke College, Dubuque, Iowa and was a teacher/administrator for 40 years. Her missions included St. Joseph Juniorate, St. Louis, MO in 1967, Fontbonne University, St. Louis, MO in 1968, Little Flower School, Mobile, Al in 1969, 1975 St. Joseph School/Parish, Marietta, GA, in 1975, St. Rose of Lima, Houston, TX, in 1979, Avila University, KCMO, in 1989, St. Mary On The Hill School, Augusta, GA, in 1990, In Transition in 1994, Holy Cross School, Champaign, IL, in 1995, St. Teresa's Academy, KCMO, in 1999 and Nazareth Living Center, in 2000. She is survived by her mother Mary Carol Mitchell, sisters Margaret M. Mitchell and Mary Jo Phelps (Mike) and brother Joseph W. Sterner (Marilynn) as well as aunts, uncles, nieces, nephews and cousins. Wake is 3-7 p.m. Sunday January 29, at Nazareth Living Center Chapel, 2 Nazareth Lane, St. Louis, MO 63129 with service at 3:30 p.m. A Mass of the Resurrection 10 a.m. Monday January 30, at the Nazareth Living Center Chapel. Burial immediately following the Mass of Resurrection at Nazareth Cemetery. Memorial contributions may be made to the Sisters of St. Joseph of Carondelet, St. Louis Province, 6400 Minnesota Avenue, St. Louis, MO 63111. She will be greatly missed by all of the teachers, students, parents of students and associates of her many years in education. She will be remembered with joy by her family and friends. Published in InfoKwik Kansas City News from 1/29/2006 - 2/3/2006.
Monday, June 08, 2009
Front suspension change on a 2001 Nissan Pathfinder
On a relatively level and firm surface, block the rear wheels, put on the parking brake, put it in gear, and break the front lug nuts loose. If you have a big enough jack, just jack the frame up until the wheels are off the ground then put jack stands under the frame on both sides. Refer to your owner's manual for the jack points. But you may have to make some up on your own too, use a little piece of wood for extra protection. Just don't use anything that looks like sheetmetal, or that it might bend easily.
The struts are self-limiting packages, and are completely safe to work with as long as you DON'T loosen the large nut in the center of the top strut mount. That one nut holds the strut on the bottom to the strut mount on the top (with the highly compressed spring in the center). If you were to unscrew that, the strut would shoot one way and the mount would shoot the other way for about 15 feet. I know, I intentionally did that when I replaced my Altima front struts.
It isn't unreasonably hard to disassemble and repackage the struts for a car with a McPherson strut compressor. I tried doing it with the much stiffer Pathfinder lift springs and it wasn't going to happen. I highly recommend getting your local auto mechanic with a hydraulic or screw press to assemble your new struts for you.
To remove the strut, ensure your wheels are completely off the ground and the IFS arms are hanging free with no tension, this ensures the strut package is not compressed at all. Remove the wheel, detach the ABS wire hanging on the strut, and brake line hanging on the strut. Unbolt the front anti-sway bar and swing it into the front of the wheel well. Remove the lower 2 strut bolts securing it to the steering knuckle. Secure the bottom of the brake rotor with something. Remove the 3 nuts securing the strut package to the engine compartment. If you are lucky, your whole suspension will just fall on whatever is supporting the brake rotor. But you may have to jiggle everything around until the strut package drops down. See my first post about lifting a Pathfinder for the contortions to work the strut package out.
Reverse the steps to reinstall your newly assembled strut package.
Rear suspension change on a 2001 Nissan Pathfinder
So I realized my previous post on installing a lift kit on a 2001 Nissan Pathfinder didn't get into the nuts and bolts on how to do this stuff. I'll do this one on removing the rear suspension components, and another on the front. Installing is just doing the reverse.
On a relatively level and firm surface, shift the truck into 4wd, block the front wheels, put it in gear, and break the rear lug nuts loose. It is preferable to remove the panhard rod, but it is not necessary to install the lift, and you will need a bearing type puller to remove it. I tried to hammer it off, and the truck would have none of it.
If you have a big enough jack, the easiest way to do this is just jack the frame up until the wheels are off the ground then put jack stands under the frame on both sides. Refer to your owner's manual for the jack points. But you may have to make some up on your own too, use a little piece of wood for extra protection. Just don't use anything that looks like sheetmetal, or that it might bend easily. The springs won't pop out on you. They will be held just in the spring perches by the strut travel limit. At that point, the springs shouldn't have any tension on them anyway. You should be able to grab the spring and jiggle it back and forth. If they seem to have tension still, stop and recheck everything.
Now I didn't have a tall enough jack, so the alternate PITA method is to jack the truck up by the axle as far as you can, put jackstands under the frame, then lower the jack until the axle is hanging free and the wheels are off the ground. I always put a 2nd jack under the frame with a little tension on it in case the jackstands fold. I've actually had a jackstand fold up on me (fortunately I wasn't under the car). There was a slight incline where we were working, we had to take the parking brake off to remove the integrated rear brake rotor and parking brake drum on an Infiniti car (man that seemed like a stupid design), and our chocks didn't hold. A 2nd jack might give you enough time to get out from under the truck if it were falling.
Remove your first wheel and shock. That stuff is pretty straightforward. Now you are ready to remove the spring. If the panhard rod were removed, you could lower the axle until the spring just fell out. Since I left it on you need a few tricks to get the spring out. First I used the McPherson strut compressors to compress the spring a little bit to get it to slide over the lower spring perch. This is the only slightly dangerous part (aside from working under a jacked up truck). Be sure the strut compressor is installed good and use the spring safety hooks if available on the compressor. You don't want to be near that thing if it gave way.
I also put a jack underneath the axle on the other side and jacked it up just a little, which caused the wheel I was working on to droop just a little more. As you are doing this, mind the rear brake line, differential vent, and any other wiring to the axle like ABS sensors, you don't want to tear them. The spring slid out with minor effort.
Now just put everything back together with your new springs and shocks.
Thursday, June 04, 2009
Installing an aftermarket stereo in a 2001 Pathfinder
Note: if you are really interested in this, you may want to bookmark it and come back in a week or 2 as I finish the install and flesh it out more.
I have a 2001 Nissan Pathfinder that I finally decided I wanted built in iPod control and Bluetooth. My brother recommended Kenwood, and I really liked his from about 6 years ago. After seeing the Kenwood KDC-742U was getting pretty bad reviews on Amazon, I decided to go with Pioneer. The DEH-P7000BT got great reviews, but the brand new DEH-P7100BT had some cool new features like a dot matrix display; so I decided to take a risk on it.
My Pathfinder has steering wheel controls and the crappy Bose system. Yes it sounds good when it works, but Bose stuff tends to break and is horrendously expensive to repair when it does, because every speaker has its own amplifier. OEM crap and Bose crap is expensive alone, so mixing the 2 is asking to be robbed.
Making the Bose speakers / amps happy
My speakers were still working, so I was going to keep them for $ savings. Of course Bose amps and speakers are finicky. The speakers are really low impedance 1-2 ohms, so you can't just bypass the amps and drive the speakers with an aftermarket headunit or you'll burn it out. If you wire your aftermarket speaker wires to the Bose amp inputs you will get horrible results.
If you wire your stereo with sub-4 volt RCA preamp outputs directly to the Bose inputs it is pretty much guaranteed the results will suck. It seems some people have wired their stereo with 4 volt RCA outputs directly to the Bose amps and it has worked well. The foolproof way to wire it up is to wire the stereo preamp outputs to an integration adapter with adjustable gain, and the adapter to the Bose inputs. I'm using an old Scosche FAI-3 integration adapter. They don't sell it anymore, but they sell a SLC-4 which is the same thing.
A final problem about 4 Bose amps and an electric antenna. Aftermarket stereos these days tend to have 1 lead designed to signal an amp to turn on or an electric antenna to extend. When you have just those 2 things, it generally has enough power to get the job done. But if you have 4 amps and possibly an antenna it is usually just too much. The answer is to install a relay that has enough power to turn all 4 or 5 devices on.
Some parts you'll need -
Metra 70-7551 Nissan 1995-2007 with RCA outputs or 70-7550 with bare wires
Metra xxxxx Nissan 1987-1994 with bare wires
Metra 40-NI10 Nissan antenna adapter to aftermarket stereo
Adapter for OEM steering wheel control of aftermarket stereo
PAC Audio makes adapters to control your new aftermarket stereo with your OEM steering wheel controls. Most car manufacturers have one wire that goes to the steering wheel remote control. Each button contains a resistor with a different ohm rating. The stereo detects the resistance on that single wire to determine which function is being requested.
So of course PAC adapters expect this, and of course Nissan (along with Harley) do something different. They've got one wire for each remote control button. That's pretty wasteful in the automotive industry, but whatever. For a PAC Audio adapter to work with a Nissan, you've got to connect a different resistor between 46 ohms and 2k ohms to each of the remote control button wires, then connect all of those resistors to the white wire on the PAC unit. Doing this right in the wires as they recommend is asking for a fatigue break, so I am going to mount them on a PCB and use stranded wire coming on and off the board.
One note of caution if you try to test the wires coming from the remote control buttons. They aren't just simple switches. With the ignition off, if you press a button, you will find the resistance changes slightly on all 5 wires. This confused the hell out of me until I decided to try it with the key in ACC. When I did that, the resistance changed a lot on only the wire connected to that button and not at all on the other 4 wires. So the remote control has some kind of probably solid state relay inside it that must be powered to work.
So, I decided to put the amp turn-on relay and steering wheel resistor network in a single little box. I used the following parts -
Radio Shack - Expensive but immediately available
275-233 SPST 12VDC Reed Relay with 0.5A@125VAC contacts
276-159 Dual General Purpose IC PC Board
270-408 Enclosed 2 AA Battery Holder
22 gauge stranded wire
I gutted the battery holder, enlarged the hole with the wires exiting and made a new hole on the other side so I could get a total of 10 wires out of it. I scored the PCB so it would fit, then I soldered the relay, resistors and wires to the PCB board. Finally I buttoned it all up and got ready to wire it in.
Proper crimping
The wire crimpers sold at auto stores do a horrible job. They don't make a reliable and solid connection. You should use a ratcheting style terminal crimper. They can be found on eBay for about $30, but are generally $100 if you go to a good electrical hardware shop. You can learn a lot about proper crimping here -
http://www.pbase.com/mainecruising/wire_termination
Tuesday, June 02, 2009
ASUS is acting bizarre - what the heck is going on there?
I used to prefer ASUS motherboards price permitting, and I'd generally only buy their graphics cards. They seemed to make more reliable hardware, with better documentation, and decent support (compared to the other Taiwanese manufacturers.) I was looking forward to buying an eeePC in the not distant future. But something bizarre is happening inside ASUS corporate, and I don't want to facilitate their bizarre behavior.
At Computex Taipei, chairman of Asustek, Jonney Shih apologizes Qualcomm chose to show an Asus derived product. ""I think you may have seen the devices on Qualcomm's booth but actually, I think this is a company decision so far we would not like to show this device. That's what I can tell you so far. I would like to apologize for that."
It was an eeePC running a Qualcomm ARM processor and Google's Android operating system. Reports were that it looked great, really polished and ready for production. Yet Jonathan Tsang, vice chairman of Asustek, said the Eee PC with Android is not ready yet because the technology is "not mature."
http://www.computerworld.com/action/article.do?command=viewArticleBasic&articleId=9133813
From what I have heard, the only thing "not mature" was the Asus customized version of Xandros Linux they tried putting on eeePCs. I've read reports people had to dump it because updates would kill the operating system. Some people put XP on it and were reasonably satisfied, but it slowed the machine down and ate a lot of disk space. Those who put the Linux distribution eeebuntu on it have been happy and said it really lets the machine shine.
Gordon Kerr Asus Austrailian Consumer Market Product Manager told a reporter Linux is likely to be phased out of the Asus eeePC product line, and “If you want the full functionality of a notebook you are going to go with Windows.”
http://www.computerworld.com.au/article/304693/has_asus_all_given_up_linux
That's a pretty amazing claim, and about 180 degrees from the historical perception of Linux, and the realities of what netbooks are purchased for. Netbooks don't have all that much "functionality" to start with. They are meant to surf the web and open/edit Office documents during travel, both of which Linux on netbooks does quite well without the licensing fees and bloat of Windows. Linux is much more flexible than Windows, but you need to be more computer savvy to get that better functionality out of Linux. A lot of this has to do with the multiple types of better support companies provide Windows. Windows, while resourse intensive, and being occasionally known to eat itself, is more familiar to the basic computer user, given it is on 88% of consumer and personal business computers.
Is Microsoft putting the screws to Asus behind the curtains? Or is Asus not sophisticated enough to recognize good business and technical opportunities and plan well enough to capitalize on them? With all this going down, I'm not sure I want to support Asus in their strange and disappointing behavior towards Linux.
Saturday, May 30, 2009
Setting up a network scanner using SANE
SANE is scanning software for Linux. It stands for Scanning Access Now Easy. It can act as a server with Linux package (x)inetd, so a computer can use the scanner connected to a different computer. And it is INsaneLY tedious and time consuming to set up.
I have my HP 4180 printer/scanner connected to my desktop/Mythbuntu machine, and my laptop can use the scanner. To set this up, first ensure your desktop connected to the scanner can in fact scan. If it can't the first thing to check is SANE is installed. This will install it if not already there -
#apt-get install sane-utils
Now ordinary users must be able to scan, so go to System-Administration-Users and Groups be sure your user name is a member of the scanners group.
There are multiple versions of (x)inetd. It is a software package that spawns a program or process when a request comes in from the network. It is probably not installed, so I would recommend using xinetd not inetd. To install -
#apt-get install xinetd
Now to open the configuration file of xinetd
# sudo nano /etc/xinetd.conf
Copy and paste the following into it -
service sane-port
{
port = 6566
socket_type = stream
wait = no
user = (your user name, or check the user name in the group saned)
group = saned
server = /usr/sbin/saned
}
Now open /etc/sane.d/saned.conf and put in the computer names, IP addresses, or IP address ranges that may access the scanner. My favorite is to do it like so if you would like to allow any computer with the IP address 192.168.1.0 to 192.168.1.254 to access the printer -
192.168.1.0/24
Finally restart xinetd
# /etc/init.d/xinetd restart
On the laptop, open /etc/sane.d/net.conf and type the name or IP address of your desktop with the scanner.
You should now be able to open SANE on the laptop and it will find, and be able to scan from your scanner connected to your desktop. This was compiled from a lot of sources, but the most helpful was
Friday, May 29, 2009
MythTV MythBuntu tweaking
Here are some tweaks I made to my MythBuntu install, which is a distribution of MythTV
MythTV is similar to TiVo, but it is free to use, and free to change, and is much more powerful. It is usually easy to set up a basic install, but depending on your hardware, and the distribution you chose, and your special requirements, it can be fiendishly complex to get running to your satisfaction.
MythTV Volume Too Low
There are 4 places to look if the volume is too low when watching TV. First check in your distribution's volume control in the regular menus. This assumes you have the line out connected to your TV, rather than your headphone out. I suggest being sure your master volume and PCM are set to at least 90%. Then look in your MythTV menus (frontend setup>setup>general) and ensure both volume controls are at 90%. Next, SSH into your Myth computer and run
# alsamixer
# sudo alsactl store
Run The Schedule Grabber
The job that fills the TV listing is called mythfilldatabase. It initially grabs 14 days of listings, but if the listings are present, it only grabs tomorrows listings and the listings for the 14th day from now. This is to catch schedule changes at the last minute, and limit the amount of data required.
For some asenine reason, MythBuntu isn't set up to automatically run mythfilldatabase daily. So if you don't set it up, every day you will notice you have one less day of listings available. To set it up, go to
Reduced power mode for the advanced audio output isn't enabled by default
Gives a timeout of 60 seconds
Disables the controller, but will click on wakeup
You can cat these settings to see what they are, the first one 0 is disabled
Even though it shouldn't be able to do this, FoldingAtHome can sometimes steal enough CPU cycles to make Flash videos in Firefox choppy. To start and stop it pre Ubuntu 9.10 run -
sudo /etc/init.d/foldingathome [stop|start|restart|status]
To start and stop it on Ubuntu 9.10 and after, run -
sudo service foldingathome [stop|start|restart|status]
Live TV Idle Timeout
If you forget to turn off live TV viewing, it can run for days with the television off. This increases your power consumption and decreases your hard drive life due to the way MythTV works, to be able to record a TV show from the beginning when you are in the middle of watching it. If you'd like live TV to stop after a period of inactivity, you'll need to add a database record.
First you need to find your mysql password
MythTV is similar to TiVo, but it is free to use, and free to change, and is much more powerful. It is usually easy to set up a basic install, but depending on your hardware, and the distribution you chose, and your special requirements, it can be fiendishly complex to get running to your satisfaction.
MythTV Volume Too Low
There are 4 places to look if the volume is too low when watching TV. First check in your distribution's volume control in the regular menus. This assumes you have the line out connected to your TV, rather than your headphone out. I suggest being sure your master volume and PCM are set to at least 90%. Then look in your MythTV menus (frontend setup>setup>general) and ensure both volume controls are at 90%. Next, SSH into your Myth computer and run
# alsamixer
Again set the master volume and PCM to at least 90%. So the volume change sticks on reboot, run
# sudo alsactl store
Finally while watching TV or a recording, try pressing F10 and F11 to change the frontend in-viewer volume control. Between this and the TV volume control, you should be able to get it loud enough, and equal to the live TV volume when watching through the TV tuner
Run The Schedule Grabber
The job that fills the TV listing is called mythfilldatabase. It initially grabs 14 days of listings, but if the listings are present, it only grabs tomorrows listings and the listings for the 14th day from now. This is to catch schedule changes at the last minute, and limit the amount of data required.
For some asenine reason, MythBuntu isn't set up to automatically run mythfilldatabase daily. So if you don't set it up, every day you will notice you have one less day of listings available. To set it up, go to
Utilities/Setup -> Setup -> TV Settings -> General -> 7th screen, enable "Automatically run mythfilldatabase". For "Log Path" I used "/tmp/mythfilldatabase.log".
Power Saving
Reduced power mode for the advanced audio output isn't enabled by default
# sudo -i
# echo 60 > /sys/module/snd_hda_intel/parameters/power_saveGives a timeout of 60 seconds
# echo Y > /sys/module/snd_hda_intel/parameters/power_save_controllerDisables the controller, but will click on wakeup
# exitYou can cat these settings to see what they are, the first one 0 is disabled
Folding At Home
Even though it shouldn't be able to do this, FoldingAtHome can sometimes steal enough CPU cycles to make Flash videos in Firefox choppy. To start and stop it pre Ubuntu 9.10 run -
sudo /etc/init.d/foldingathome [stop|start|restart|status]
To start and stop it on Ubuntu 9.10 and after, run -
sudo service foldingathome [stop|start|restart|status]
Live TV Idle Timeout
If you forget to turn off live TV viewing, it can run for days with the television off. This increases your power consumption and decreases your hard drive life due to the way MythTV works, to be able to record a TV show from the beginning when you are in the middle of watching it. If you'd like live TV to stop after a period of inactivity, you'll need to add a database record.
First you need to find your mysql password
myth@myth:~$ nano /etc/mythtv/mysql.txtNow sign into mysql
myth@myth:~$ mysql -u mythtv -p mythconvergEnter the initial settings (this will shut down the live TV front end on a box called 'myth' after 2 hours)
Enter Password:
mysql> INSERT INTO `mythconverg`.`settings` (`value`, `data`, `hostname`) VALUES ('LiveTVIdleTimeout', '240', 'myth');If you'd like to change it so all live TV frontends shut down after an hour, then you do an update
mysql> UPDATE `mythconverg`.`settings` SET `settings`.`hostname` = null, `settings`.`data` = '120' WHERE `settings`.`value` = 'LiveTVIdleTimeout';To see what you have set, do a
mysql> SELECT * FROM `mythconverg`.`settings` WHERE `settings`.`value` = 'LiveTVIdleTimeout';Exit when you are happy
mysql> exit
myth@myth:~$
Wednesday, May 20, 2009
Configuring xorg.conf on Linux
If the X server (graphical and video display) doesn't automatically configure on your Ubuntu distro, you have my sympathies. VESA is the backup display method, and while it generally works, it is painfully slow. Don't expect to be able to do any quality multimedia viewing in VESA.
Despite tens of hours trying to install and configure a binary accelerated driver for Sis 671 integrated graphics, I have never got it to work. While people are down on Nvidia for not open-sourcing their drivers, they do generally at least work well. Intel graphics are open-source and work decently, but Intel doesn't offer any graphics systems with real horsepower.
In this blog post, I will continue to add notes and hints for resolving problems with the configuration file of the X server, called xorg.conf.
To get information on your monitor
$ sudo apt-get install xresprobe
$ ddcprobe
Other options are read-edid, `get-edid | parse-edid`
Thursday, May 14, 2009
Setting up HP printer and CUPS on Xubuntu or Mythbuntu
My NSLU2 Unslung install quit booting for the 2nd time. Initially several hours of research, trial, and error, got the Slug recognizing the hard drive and booting again. This time the same steps didn't work. I decided the Slug isn't worth the trouble since my Mythbuntu machine is always running too. Now the Slug services (file/print/itunes server) will go on the Myth machine. Hopefully that will be more stable. Mythbuntu is a Ubuntu distribution of MythTv, a TiVo like software package.
Unless you are a masochist, only buy a HP, or maybe an Epson printer to use with Linux. Fully postcript compliant network printers are also "easy" to set up. Anything else, and you are asking for a visit to the nut house.
The docos for Ubuntu are some of the better around, but at times they leave much to be desired. Mythbuntu is really a Xubuntu distro with a lot of the desktop based packages yanked out and the media player added in. Xubuntu docos are like the red-headed step-child of the Ubuntu world.
It took me a while to figure out due to incomplete and some inaccurate info, but Mythbuntu doesn't come with a subsystem to recognize printers and try to set them up. With a HP printer, you need to install (using Synaptic) "hplip" and "hplip-gui". Your printer may not be recognized without restarting. Supposedly hotplugging is sufficient, but it didn't work for me. You should now have a HP icon in the top right corner; you can click on it, go to settings, print test page and the printer should work.
Now I want to print from other computers. CUPS is what I use, and it is installed as a dependency of hplip, but it is not set up correctly by default unless you are only printing from the computer it is attached to. And why the hell would you use CUPS for that? To get CUPS set up correctly for printing from any computer on your network, you need to
sudo nano /etc/cups/cupsd.conf
And edit the following lines
Where it says...
# Only listen for connections from the local machine.
IF the IP address of your Myth machine the printer plugs into is 192.168.1.100, then add...
Listen 192.168.1.100:631
Where it says...
# Restrict access to the server...
If all your computers have ip addresses 192.168.1.xxx then add
Allow from 192.168.1.0/24
# Restrict access to configuration files...
Now you must restart CUPS by running the command
sudo /etc/init.d/cups restart
You should now be able to view and edit the CUPS server information on the Myth computer, or any other computer by going to http://192.168.1.100:631 in your browser. You should get no 403 Forbidden! errors.
To add the printer on another Ubuntu machine, go to http://localhost:631. Choose "Add printer," answer some of the BS questions, and use the printer location http://192.168.1.100:631/printers/nameofyourprinter
You can add the printer on a Windows computer similarly by going to "Add a network printer" and giving the above address.
I'll post how to add SAMBA file sharing features and iTunes mt-daapd song sharing features to a Mythbuntu install later. This is also so I'll remember how to repair my install when it inevitably craters in the future.
Unless you are a masochist, only buy a HP, or maybe an Epson printer to use with Linux. Fully postcript compliant network printers are also "easy" to set up. Anything else, and you are asking for a visit to the nut house.
The docos for Ubuntu are some of the better around, but at times they leave much to be desired. Mythbuntu is really a Xubuntu distro with a lot of the desktop based packages yanked out and the media player added in. Xubuntu docos are like the red-headed step-child of the Ubuntu world.
It took me a while to figure out due to incomplete and some inaccurate info, but Mythbuntu doesn't come with a subsystem to recognize printers and try to set them up. With a HP printer, you need to install (using Synaptic) "hplip" and "hplip-gui". Your printer may not be recognized without restarting. Supposedly hotplugging is sufficient, but it didn't work for me. You should now have a HP icon in the top right corner; you can click on it, go to settings, print test page and the printer should work.
Now I want to print from other computers. CUPS is what I use, and it is installed as a dependency of hplip, but it is not set up correctly by default unless you are only printing from the computer it is attached to. And why the hell would you use CUPS for that? To get CUPS set up correctly for printing from any computer on your network, you need to
sudo nano /etc/cups/cupsd.conf
And edit the following lines
Where it says...
# Only listen for connections from the local machine.
IF the IP address of your Myth machine the printer plugs into is 192.168.1.100, then add...
Listen 192.168.1.100:631
Where it says...
# Restrict access to the server...
If all your computers have ip addresses 192.168.1.xxx then add
Allow from 192.168.1.0/24
And add the same "Allow from" directives again under the headers
# Restrict access to the admin pages...# Restrict access to configuration files...
Now you must restart CUPS by running the command
sudo /etc/init.d/cups restart
You should now be able to view and edit the CUPS server information on the Myth computer, or any other computer by going to http://192.168.1.100:631 in your browser. You should get no 403 Forbidden! errors.
To add the printer on another Ubuntu machine, go to http://localhost:631. Choose "Add printer," answer some of the BS questions, and use the printer location http://192.168.1.100:631/printers/nameofyourprinter
You can add the printer on a Windows computer similarly by going to "Add a network printer" and giving the above address.
I'll post how to add SAMBA file sharing features and iTunes mt-daapd song sharing features to a Mythbuntu install later. This is also so I'll remember how to repair my install when it inevitably craters in the future.
Sunday, April 26, 2009
33 foot Irwin sailboat - It's gone... Sad, but gone...
This remains for historical reasons only
__________________________________________
After several years of half-hearted attempts to sell my parent's sailboat, we have decided to give it away to a good home. It is currently docked in Kemah Boardwalk Marina off of Clear Lake (an estuary of Galveston Bay).
It is a 1974 Irwin sailboat, 33 ft length, rare retractable keel centerboard (great for shallow coastal sailing), 4 ft draft retracted, 7 ft draft extended, 7 berths, fiberglass hull, tiller, inboard Atomic4 gas engine, sloop rigged, Coast Guard documented (only means it is registered for offcoast sailing), has mainsail, jib, storm jib, and 110% jib that needs hemming.

Regular maintenance has been neglected in the last five years -
Mast step is rotten in bilge causing the ceiling to sag some and deform the partition in the head. Needs to be demasted and the step rebuilt.
Head needs to be rebuilt or replaced and a holding tank put in, until then there is always potty bags!
Fuel tank not installed to code. It isn't truly dangerous in calm seas. The previous owner installed it and I never got around to fixing it.
Wiring is old and not up to code.
Needs a bottom cleaning, and really a topside paint too.
All thru hulls are frozen open and need replacing.
The fiberglass hull is in good shape for a 35 year old boat. The last time I went down there I didn't find any delamination.

Engine needs new or rebuilt carb, some other minor work to get it running, it'd probably like an overhaul. This is a very simple and stout motor. You can rebuild it yourself relatively easy except a few steps that require a trip to a machinist. If you are going to junk the motor, I might like to have it as a pet project.
If you are new to boating, docking a boat this big runs $200-300 per month, liability insurance is generally required by marinas and is about $50/mo more. Kemah Boardwalk Marina is a "premium" joint (just over $300/mo) because of the easy access to Galveston Bay, and good old Tillman's amusement park down there. If you want it at a cheaper place, you could have it towed, or I can try to help you get the engine running in a weekend to motor it there.
If you are interested, send me an email at one(at)thegebharts.com or post a comment. My brother Patrick will likely be showing you the boat. It is a long drive for him, so I am sure he'd like to know you were serious about potentially taking on this "project". The biggest consideration for who we chose to give it to will probably be how fast you are able to take over the slip and insurance fees. Parents are getting tired of paying for a toy they can't use. Thanks.

Thursday, April 23, 2009
Enhanced Interrogation
Summarized from ConConejo's post at HuffPost
By far right wing Neo-Con Rep fiat...
Torture must now be called "enhanced interrogation"
Rape is called "involuntary penetration"
Robbery is called "unexpected appropriation"
Stabbing is called "terminal acupuncture"
Shooting is called "projectile intolerance"
Who knew a euphemism could make something illegal and immoral somehow seem less criminal and morally acceptable? Those crazy funny facists!
http://balkin.blogspot.com/2009/05/news-flash-taliban-waterboards-captured.html
If you can think of other ones, put them in the comments!
Friday, March 27, 2009
IE8 Tweaks and Fixes
I'll keep adding to this post as I find new tweaks and fixes
Tweaks
None currently
Fixes
If IE 8 is slow and buggy on your system, try reregistering the ActiveX Interface Marshaling Library. At a command prompt type
>regsvr32 actxprxy.dll
In Vista, you must do this from an elevated command prompt.
Advice from - zdnet
Tweaks
None currently
Fixes
If IE 8 is slow and buggy on your system, try reregistering the ActiveX Interface Marshaling Library. At a command prompt type
>regsvr32 actxprxy.dll
In Vista, you must do this from an elevated command prompt.
Advice from - zdnet
Tuesday, March 03, 2009
Dog toys that cause tongue amputations
This toy allegedly resulted in the death of one dog in 2005, and the amputation of another dog’s tongue in 2008. The email below was supposedly widely circulated in mid 2008, immediately following the incident with the author’s dog, though I never heard about it.
Snopes
Author’s Blog
Company Recall
Consumer Product Safety Commission recall by company website
I’d suggest being sure all balls for your dog (and other toys that could create a vacuum after being squeezed) have vent holes on opposite sides of the toy to prevent this from happening.
Regardless of their conciliatory tone now, there is a credible allegation Four Paws was informed of a death caused by this toy in 2005 and did nothing. It wasn’t until the author outed them in 2008 that they recalled the toy from their distributors. No one who bought this toy before late 2008 would know to check the company website for recalls.
It is unconscionable Four Paws hasn’t requested CPSC post a voluntary recall of this product. And while it was reasonable Four Paws referred the author to their insurance company for further discussion, the insurance company allegedly lied about the possible 2005 dog death caused by this product, initially declined to recall the product, and in general the company reaction was totally unacceptable. If an insurer treated one of my Customers similarly, I would work towards replacing them immediately.
We obviously don’t know what the author was requesting from the insurance company, and I don’t think pain and suffering compensation would be reasonable. But I think all vet bills to this point should be refunded, in addition to consideration for future vet and food bills caused by this injury, and some provision for the author’s lost time in feeding and retraining the dog.
Wednesday, July 23, 2008
Update on Maxent and Olevia TVs
Well,
Syntax-Brillian is in bankrupcy and will be reconstituted as Olevia International. The immediate result is the likely cancellation of warranty on all old Olevia TVs. Personally I would no longer buy an Olevia TV. One of the features I really liked about them is they would send you parts and instructions to perform your own warranty work. With the exception of the display (which is not fixable by anyone), working on flat panel TVs today is as easy as building your own computer, and I would pay more for a TV from a manufacturer who allows this.
Samsung and LG provide most of the panels for many TV manufacturers, and their label TVs have come down considerably in price. I would go with them for a new TV, or possibly consider Vizio.
Back to our Maxent TV. It was replaced under warranty with a refurb. When the box arrived, it had a hole in the bottom I didn't notice until removing the TV. I saw no damage to the TV though. The damn thing wouldn't turn on with the remote. I called Maxent customer service, and got automatically disconnected as usual. Then I called the Costco/Maxent direct line. The Maxent rep said he would prepare another RMA and ship it back to them at their expense (how thoughtful), and would contact us when they were ready. Two weeks later I haven't heard from him again.
The next day, my girlfriend discovered that sitting on our couch 10 feet away there was approximately 2 foot strike zone, with about 5 degrees of tolerance, where you could point the remote and it would work about 60% of the time. Anywhere else the remote wouldn't work at all. This was totally unlike our first Maxent where you could point the remote anywhere in the general direction and it worked 99% of the time.
I swear this replacement TV screen is much hotter looking than our original TV. I have been unable to adjust it out with brightness and contrast. And while analog TV reception is still almost faultless, digital reception on the new TV is awful. It never pixelates. But half the time digital reception won't come in on 2 or more of 6 stations. Sometimes stations will come in if you switch from the channel higher (6) down to the digital station (5.1), but not if you switch from the lower analog station (5) up to the digital (5.1).
Have I said yet to not buy Maxent TVs?
Sunday, July 13, 2008
Don't buy Maxent or Sampo Televisions!
... and other observations on flat panel TVs.
So my girlfriend won a Maxent plasma TV at the opening of Dunn Brother's Dallas (a cool alternative to Starbucks.) They bought it from Costco. It has a great picture, excellent reception, very good menu system and remote responsiveness. But after 7 months it quit turning on. Not that disappointing, it happens. But what happened next shows what a crappy company Maxent is.
I went to their website and filled out the form for support. I got a form email reply that all contact must be through telephone. Their telephone customer service always gives voicemail that all agents are busy and call back some other time, then hangs up without allowing you to leave a message. I hate companies that do that. I want to leave an email or voicemail and you get back to me when you are available. It is unacceptable to waste my time trying to get ahold of a company rep.
I got a back door phone number from Costco customer service (888-373-4368x108) that is answered by a human. Maxent refused to consider warranty without proof of purchase. I was worried about that but thought they might consider it as a courtesy and for good word of mouth advertising. I finally managed to get the receipt from the nice Dunn's Brother's manager.
It took Maxent 2 weeks to from the time I emailed them, to "validate the receipt" and send the replacement part to the local warranty tech. The part didn't work, and even he wasn't able to get through to Maxent tech support for help either. I gave him the back door phone number. That rep said there was nothing else they could do and have the customer call them.
So of course I called the same guy right back. He didn't even acknowledge that he had just been discussing my TV, and that I might have been right there where I could have spoke with him at the same time. He said I have 2 options, the first was give them a deposit for immediate shipping of a replacement TV, and the deposit will be returned when they receive our TV. Oh hell that wasn't going to happen. I wasn't going to risk inadvertently buying their crap products and customer service. Or I could send our TV, and they would send the new one when the broken one is received. I was ok with that. It's not like the TV hadn't been out of commission for a month already.
They said they will not cover our shipping expense. So we had to spend $140 to ship their junk under warranty back to them. I debated whether it was worth it or if we should cut our losses and trash it. After reading the warranty I discovered they could have got us for twice that because after 90 days they don't have to cover any shipping. They do it just so they don't have to keep sending parts and paying a warranty tech till the tech figures out Maxent's problems.
Even finding a company to ship the TV back to them is an issue. They refused to give any advice on who to use. FedEx won't cover damage on plasma TVs over $250 and DHL won't cover over $500. There was no additional insurance option. Only UPS covered the full declared value only if they determine the product was packed appropriately. Maxent only said they prefer the TVs returned in original packaging, but the UPS rep said original packaging doesn't always satisfy "appropriate" packing requirements for insurance consideration. What a cluster screw! In the end it took them just short of another month from the time we shipped our TV to them until they got a replacement back to us.
As we were going through this, the Costco rep mentioned it was the worst warranty she had ever read. She mentioned Vizio TVs have an excellent warranty. My Olevia TV has been very reliable with an excellent picture, and it was very cheap.
The issues I have with the Olevia are the digital TV reception isn't great (pixelates and drops when other TVs don't), it sometimes shows the CC data at the top of digital picture and when you hide it with vertical adjustment it throws the analog picture off by 10 times as much, the remote is very unresponsive with variable delay, and combined with a poor menu system it is easy to screw things up like accidentally deleting all your skipped or favorite channels.
Saturday, December 29, 2007
Installing a suspension lift on my 2001 Pathfinder... or finding Dante's hell.
Abstract -
DON'T buy Rancho RS5000 shocks for R50 Pathfinders, EXPECT installation to take at least 10 hours of work your first time in a home garage, DON'T start this project without having a mechanic you trust with the proper hydraulic press willing to assemble the strut packages - those pansy screw MacPherson strut compressors won't cut it on the bigger and stiffer lift springs.
On to the full text -
I decided to lift my 2001 Nissan Pathfinder so it would look more like a truck and less like a minivan. The shocks blew out a couple days before Christmas so I figured it was easier to do the whole enchilada now. I went with Automotive Customizers 2 inch lift springs. Also from them I got KYB front struts, Rancho RS5000 shocks, and strut boots. I was mostly happy with AC's service. I emailed them Thursday night before Christmas asking if they could get the parts to me within a week. They called me early the next day to say they could, and again that afternoon to check on me, but I didn't return their call till late Friday. AC still was able to get the stuff to me in a week. Great customer service, I just don't think they should be selling Rancho RS5000 shocks as fitting R50 Pathfinders (more on that later).
From Summit Racing I got the camber adjustment bolts. Contrary to their website, you only need 1 kit per car for up to 2 degrees camber adjustment, or 2 kits per car for up to 4 degrees. I don't know how keen I am on using 2 kits per car. The bolts are substantially thinner to accommodate the eccentric cam. I haven't found a good guide for installing lift springs on R50 Pathfinders, and the official service manual is pretty weak on removing and installing the struts, shocks, and springs. AC's directions for rear coil installation are fairly generic but they were the best I found, and I have done strut replacements on an Altima. I thought I knew what I was getting into, that was mistake number one.
I started with the rear shocks/springs installation because I thought it would be easiest, and frighteningly it was. I found some significant problems with AC's directions in this specific application. It is impossible to remove the panhard rod axle end without a splitter. In the end I didn't remove it because it helps prevent over-extension of the middle brake line. There was no way to loosen that brake line without cracking the system open, you have to disconnect the 2 steel lines on the distribution block to the flexible line or deal with the limited travel. Be sure to remove the axle vent hose on top of the differential because it is too short. Due to the problems above I was unable to drop the axle enough, but I used the MacPherson strut compressor in an "unauthorized" way to get the old springs out and the new springs in, this took a lot of wrestling.
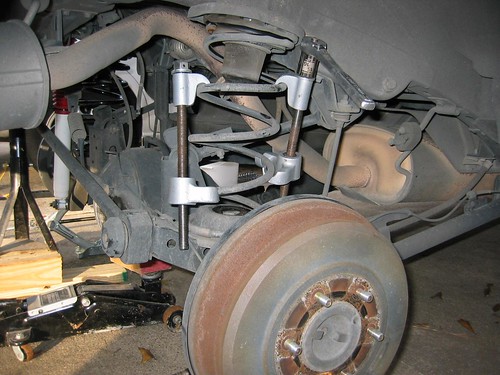
There is a rubber donut in the upper rear spring mount you can reuse. The short length of split rubber tubing around the spring in the lower mount is not reusable because the lift springs are much larger gauge. I didn't want to make another trip to the parts store, so I left it out and crossed my fingers that won't cause creaking or clanking. This split rubber hose is also used in the top and bottom of the front springs and I left it out there as well.
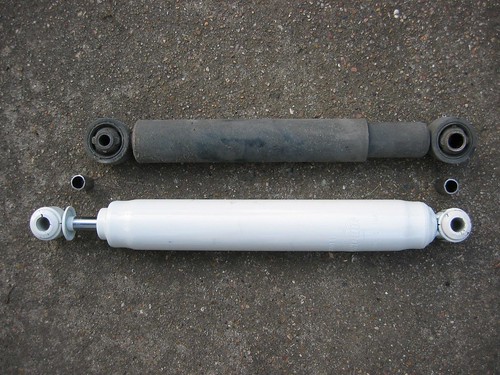
Rancho doesn't list applicability for the RS5000's on R50 Pathfinders, and there is a reason - they DON'T fit. I'm disappointed in AC for advertising they fit. The Rancho shock mounting eyelets are the same size, while the OEM eyelets are not. The inner metal bushing through the top mount is almost a half inch too narrow requiring the use of at least 2 washers to fill the gap, the bushing is also at least one size too small for the OEM mounting bolt, and tightening the nut to the recommended 55ft/lbs unacceptably compresses the ears of the shock mount together.
The bottom metal bushing is too small for use with OEM mounting stud, the stud barely fits through only the rubber bushing. I had to use 4 washers, 2 behind the eyelet, and 2 in front, and still the rubber bushing is unacceptably compressed because it doesn't have the support of an inner metal bushing. Shocks are also designed to act as the axle extension stop so the springs don't pop out, and the brake and vent lines don't over-extend. The RS5000's will probably keep the springs in, but I think the rear brake flexible line could easily over-extend and tear. Good thing the front brakes do all the work and I have ABS.
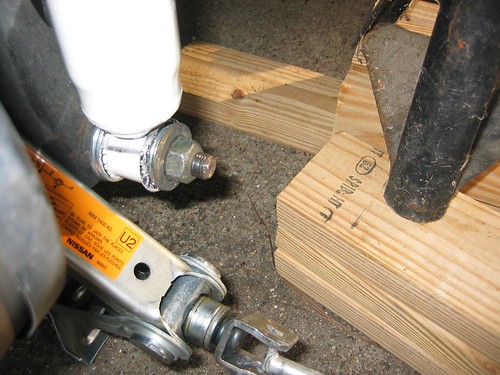
The front struts/springs ended up being MUCH harder than I planned even though I have done them before on an Altima. To get to the driver's side upper strut bracket, you must remove an accessory bracket over it. The top and air box bolts are easy. The inner wheel well bolt is almost impossible to get at. If your arm is any bigger than mine it won't fit, you'll have to remove the airbox to intake plenum, which is a major ordeal because of all the mount points and accessories hanging off it.
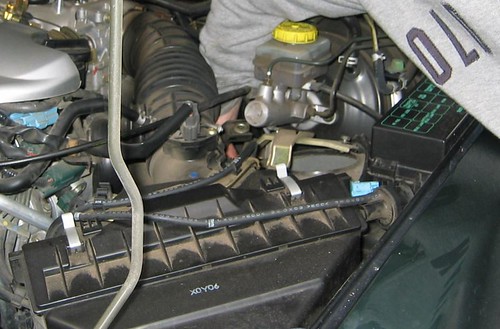
If you have never done struts before, the strut bracket only fits one way; but too many inexperienced mechanics don't know that and force them in the wrong way. Mark a stud to the hood ledge hole as shown by the 2nd red arrow. You can't wiggle the struts around enough to get them out unless you remove all hardware mounting both struts. My knuckle bolts were WAY over torqued (over 200ft/lbs) along with several other bolts on front and back suspension components. Use only 6 point sockets so you don't round the nut heads off (it will ruin your month if you do), and use a breaker bar being careful to keep the socket squared up on the nut head. When the struts are loose, with 2 people rotate the anti-sway bar up as far as you can. Finally you will be able to remove the strut by kicking the knuckle end out, down, and to the back of the car while rotating the strut top down, and to the front of the car.
The upper spring seat only fits one way. Mark it to the stud position also, like the 1st red arrow. Since the strut bracket and spring seat rotate independently when the spring tension is relieved, this mark might not be valid if the previous mechanic installed it wrong like mine did. Finally there is a notch and stamped arrow about where the 3rd red arrow is on back of the spring seat. It must face towards the engine. There should be a (W) on the spring seat 180 degrees around from the notch which will face the same direction as the knuckle mount (towards you when installed). This is all very important to have aligned when your mechanic reassembles the strut, or if you do it, when you relieve the pressure from the spring compressor.
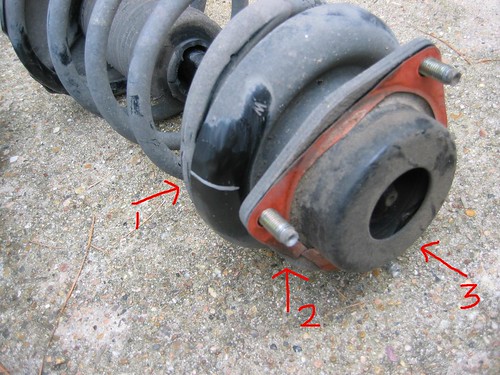
I read several places AC springs are the same size as OEM with a higher spring rate. This is incorrect. They are much heavier gauge with at least one more turn than OEM. The rear springs were about 0.75" longer and the fronts were 1.5" longer. These factors combined with the increased stiffness makes it almost impossible to use a standard MacPherson strut compressor to assemble the strut packages. I highly advise to not try unless you can afford for your truck to be out of commission for a week while you fidget and curse with them.
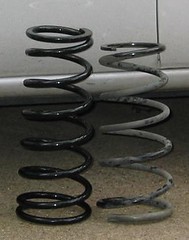
KYB struts are NOT exact OEM replacements (but they are close). Notice the first ABS wire bracket on the OEM. Now notice there is only a tab with captive nut on the KYB strut. It is another PITA I was unaware of, but it is not the end of the world to cut the bracket off the old strut, drill a hole and use a M6 x 20mm bolt and lock washer to attach it to the KYB tab.

Beware of Conroe NTB
Now why did I say have a mechanic you trust ready to assemble the struts? I ran out of steam trying to assemble them myself so I called my local NTB to ask if they would do it and how much. The manager said they usually don't do that kind of stuff, but he would get one of his mechanics to do it under the table if I tip the mechanic. When I got there he said he talked to the mechanic who requested $50 (apparently they are running their own little shop out of the NTB store, they just don't like to quote prices over the phone). I was planning on tipping him $30-40, but if he did it right $50 was worth it to be done with the problem. As the manager walked off, I said I didn't know if this was normal, but the notch (mentioned way above) needed to face opposite the knuckle. The manager huffed that his mechanic knew what he was doing.
Twenty minutes later and $50 lighter I leave for home. When I go to install the struts I discover the mechanic installed both of the spring seats 180 degrees in the wrong direction. Even worse, he didn't install one of the the thrust washers evenly so the seat and mount are cocked at an angle and won't rotate. By now NTB is closed, the manager isn't there tomorrow, I have a job done poorly and incorrectly that I have no evidence they did, or I "paid" for. I know, it was my own fault for agreeing to the arrangement, but I suggest to not let it happen to you.
No more to report
I'm stuck at this point. I have to go back to work in Dallas for a week without my truck while my dad tries to track down a competent mechanic to correct the strut packages. When I get it all patched up, I'll report back on how I like the ride and components (aside from the non-fitting RS5000 shocks).
DON'T buy Rancho RS5000 shocks for R50 Pathfinders, EXPECT installation to take at least 10 hours of work your first time in a home garage, DON'T start this project without having a mechanic you trust with the proper hydraulic press willing to assemble the strut packages - those pansy screw MacPherson strut compressors won't cut it on the bigger and stiffer lift springs.
On to the full text -
I decided to lift my 2001 Nissan Pathfinder so it would look more like a truck and less like a minivan. The shocks blew out a couple days before Christmas so I figured it was easier to do the whole enchilada now. I went with Automotive Customizers 2 inch lift springs. Also from them I got KYB front struts, Rancho RS5000 shocks, and strut boots. I was mostly happy with AC's service. I emailed them Thursday night before Christmas asking if they could get the parts to me within a week. They called me early the next day to say they could, and again that afternoon to check on me, but I didn't return their call till late Friday. AC still was able to get the stuff to me in a week. Great customer service, I just don't think they should be selling Rancho RS5000 shocks as fitting R50 Pathfinders (more on that later).
From Summit Racing I got the camber adjustment bolts. Contrary to their website, you only need 1 kit per car for up to 2 degrees camber adjustment, or 2 kits per car for up to 4 degrees. I don't know how keen I am on using 2 kits per car. The bolts are substantially thinner to accommodate the eccentric cam. I haven't found a good guide for installing lift springs on R50 Pathfinders, and the official service manual is pretty weak on removing and installing the struts, shocks, and springs. AC's directions for rear coil installation are fairly generic but they were the best I found, and I have done strut replacements on an Altima. I thought I knew what I was getting into, that was mistake number one.
I started with the rear shocks/springs installation because I thought it would be easiest, and frighteningly it was. I found some significant problems with AC's directions in this specific application. It is impossible to remove the panhard rod axle end without a splitter. In the end I didn't remove it because it helps prevent over-extension of the middle brake line. There was no way to loosen that brake line without cracking the system open, you have to disconnect the 2 steel lines on the distribution block to the flexible line or deal with the limited travel. Be sure to remove the axle vent hose on top of the differential because it is too short. Due to the problems above I was unable to drop the axle enough, but I used the MacPherson strut compressor in an "unauthorized" way to get the old springs out and the new springs in, this took a lot of wrestling.
There is a rubber donut in the upper rear spring mount you can reuse. The short length of split rubber tubing around the spring in the lower mount is not reusable because the lift springs are much larger gauge. I didn't want to make another trip to the parts store, so I left it out and crossed my fingers that won't cause creaking or clanking. This split rubber hose is also used in the top and bottom of the front springs and I left it out there as well.
Rancho doesn't list applicability for the RS5000's on R50 Pathfinders, and there is a reason - they DON'T fit. I'm disappointed in AC for advertising they fit. The Rancho shock mounting eyelets are the same size, while the OEM eyelets are not. The inner metal bushing through the top mount is almost a half inch too narrow requiring the use of at least 2 washers to fill the gap, the bushing is also at least one size too small for the OEM mounting bolt, and tightening the nut to the recommended 55ft/lbs unacceptably compresses the ears of the shock mount together.
The bottom metal bushing is too small for use with OEM mounting stud, the stud barely fits through only the rubber bushing. I had to use 4 washers, 2 behind the eyelet, and 2 in front, and still the rubber bushing is unacceptably compressed because it doesn't have the support of an inner metal bushing. Shocks are also designed to act as the axle extension stop so the springs don't pop out, and the brake and vent lines don't over-extend. The RS5000's will probably keep the springs in, but I think the rear brake flexible line could easily over-extend and tear. Good thing the front brakes do all the work and I have ABS.
The front struts/springs ended up being MUCH harder than I planned even though I have done them before on an Altima. To get to the driver's side upper strut bracket, you must remove an accessory bracket over it. The top and air box bolts are easy. The inner wheel well bolt is almost impossible to get at. If your arm is any bigger than mine it won't fit, you'll have to remove the airbox to intake plenum, which is a major ordeal because of all the mount points and accessories hanging off it.
If you have never done struts before, the strut bracket only fits one way; but too many inexperienced mechanics don't know that and force them in the wrong way. Mark a stud to the hood ledge hole as shown by the 2nd red arrow. You can't wiggle the struts around enough to get them out unless you remove all hardware mounting both struts. My knuckle bolts were WAY over torqued (over 200ft/lbs) along with several other bolts on front and back suspension components. Use only 6 point sockets so you don't round the nut heads off (it will ruin your month if you do), and use a breaker bar being careful to keep the socket squared up on the nut head. When the struts are loose, with 2 people rotate the anti-sway bar up as far as you can. Finally you will be able to remove the strut by kicking the knuckle end out, down, and to the back of the car while rotating the strut top down, and to the front of the car.
The upper spring seat only fits one way. Mark it to the stud position also, like the 1st red arrow. Since the strut bracket and spring seat rotate independently when the spring tension is relieved, this mark might not be valid if the previous mechanic installed it wrong like mine did. Finally there is a notch and stamped arrow about where the 3rd red arrow is on back of the spring seat. It must face towards the engine. There should be a (W) on the spring seat 180 degrees around from the notch which will face the same direction as the knuckle mount (towards you when installed). This is all very important to have aligned when your mechanic reassembles the strut, or if you do it, when you relieve the pressure from the spring compressor.
I read several places AC springs are the same size as OEM with a higher spring rate. This is incorrect. They are much heavier gauge with at least one more turn than OEM. The rear springs were about 0.75" longer and the fronts were 1.5" longer. These factors combined with the increased stiffness makes it almost impossible to use a standard MacPherson strut compressor to assemble the strut packages. I highly advise to not try unless you can afford for your truck to be out of commission for a week while you fidget and curse with them.
KYB struts are NOT exact OEM replacements (but they are close). Notice the first ABS wire bracket on the OEM. Now notice there is only a tab with captive nut on the KYB strut. It is another PITA I was unaware of, but it is not the end of the world to cut the bracket off the old strut, drill a hole and use a M6 x 20mm bolt and lock washer to attach it to the KYB tab.
Beware of Conroe NTB
Now why did I say have a mechanic you trust ready to assemble the struts? I ran out of steam trying to assemble them myself so I called my local NTB to ask if they would do it and how much. The manager said they usually don't do that kind of stuff, but he would get one of his mechanics to do it under the table if I tip the mechanic. When I got there he said he talked to the mechanic who requested $50 (apparently they are running their own little shop out of the NTB store, they just don't like to quote prices over the phone). I was planning on tipping him $30-40, but if he did it right $50 was worth it to be done with the problem. As the manager walked off, I said I didn't know if this was normal, but the notch (mentioned way above) needed to face opposite the knuckle. The manager huffed that his mechanic knew what he was doing.
Twenty minutes later and $50 lighter I leave for home. When I go to install the struts I discover the mechanic installed both of the spring seats 180 degrees in the wrong direction. Even worse, he didn't install one of the the thrust washers evenly so the seat and mount are cocked at an angle and won't rotate. By now NTB is closed, the manager isn't there tomorrow, I have a job done poorly and incorrectly that I have no evidence they did, or I "paid" for. I know, it was my own fault for agreeing to the arrangement, but I suggest to not let it happen to you.
No more to report
I'm stuck at this point. I have to go back to work in Dallas for a week without my truck while my dad tries to track down a competent mechanic to correct the strut packages. When I get it all patched up, I'll report back on how I like the ride and components (aside from the non-fitting RS5000 shocks).
Tuesday, September 18, 2007
Turkey Trip
I have finally been off the North American continent!
I non-reved from IAH through FRA to IST with no problems. In FRA I was able to get a flight after just a 30 minute layover. A stern German woman named Kathleen at first said, "It is not possible", but then allowed me to go when I said I didn't mind waiting on my bags in IST. It is weird she didn't tell me to go now, because delay coverage isn't provided on non-rev bags anyway, and if you are standby it is better to get there now if possible because later maybe not.
I've been posting some pictures of the trip on Flickr. I keep letting the girlfriend's camera (hi Kelly) run out of juice. But it is the only one that will allow me to download pictures. My parent's camera requires administrator privileges to connect, and I don't have them on my work laptop I brought. How stupid (about all 3 problems)!
On the first day (Sunday 16 Sept), we arrived at Hotel Sari Konak in the Sultanahmet District of Istanbul around 4pm and went out to dinner. We strolled the streets around the Hagia Sofia and Blue Mosque, and came back to the hotel to chill, but I fell asleep instead. I guess I had some jetlag. I woke up around 2 am and did some surfing to figure out how to post pictures to my flickr and blogspot accounts. It had been a while since I messed with them.
I tried to take a nap around 4:30 am, but that didn't last long. There is no need for wakeup calls in Istanbul. Around 5 am, the morning adhan blares from loudspeakers in the mosques. I was totally startled the first time. But now I find it oddly comforting, almost like one of those cues you get you are home. I know it is weird since I have only been here 2 days.
On Monday the we went to the Sadberk Hanim Museum., and then to a restaurant overlooking the Bosphorus Sea. Afterward we strolled Istiklal Caddesi, which means freedom street. It is an outside shopping district and pedestrian thoroughfare; but like most places in Istanbul, that doesn't stop people from driving on it. After a short nap and some surfing trying to figure out how to use our US cell phones in Turkey, we went out to dinner. It was on the terrace restaurant of the Seven Seas Hotel. It is kinda expensive (~50ytl or $35 a person), but a really good fish restaurant with a great view. It serves fish full monty style (head and spine removal DIY).
On Tuesday we went to Yerebatan Sarnici, or underground cistern. It was built under Stoa Basilica to supply drinking water and to water the gardens of the Great Palace. We had a light lunch on the terrace of the Kybele Hotel. It has hundreds of really pretty Turkish lamps hanging from the ceiling. On the way back to the hotel to meet my cousin Kira, we stopped by the Arasta Bazaar.
More later... Kira just got here and is hungry.
Subscribe to:
Posts (Atom)